
'Focusing on .../Java'에 해당되는 글 9건
- 2011.03.12 :: Ivy : The agile dependency manager 1
- 2011.03.10 :: [Java 기초] Package vs Import란? 2
- 2011.03.10 :: [Java] Ant 설치 및 사용
- 2011.01.20 :: [Eclipse 설치]
- 2010.05.23 :: 5. Your project contains error(s), please fix them before running your application.
- 2010.05.23 :: 4. [ Dev Tips] An SDK Target must be specified and
- 2010.01.17 :: 안드로이드 개발/자료 사이트[update:20100119]
- 2010.01.15 :: 안드로이드 개발환경 구축하기
- 2010.01.15 :: [기본 개념] J2SE vs J2EE vs J2ME 개념
- Apache Ivy is a popular dependecny manager focusing on flexibility and simplicity.
2. 설치
- download url : http://ant.apache.org/ivy/download.cgi

- 언제나 그렇지만, 자기를 읽어달라는 파일이 있다. 당연히 봐야겠지^^
"Please read doc/install.html for installation instructions."
문서를 보면 이런 문구를 발견, 당연히 다음 스테이지는..고.
- 다음 지시사항을 하달 받음


성공적으로 설치 되었다는 메시지를 확인했다.
1. Package란?
패키지란, 클래스 또는 인터페이스의 묶음이다. 왜? 사용자(개발자)들이 사용하기 편하게 하기 위해서이다. 관련된것끼리 잘 묶어 놓았다.
그런데 어떻게?
클래스가 물리적으로 하나의 클래스파일(.class)인 것과 같이 패키지는 물리적으로 하나의 디렉토리이다.


위의 화면을 보면, 각각의 클래스는, 각 기능별 의미에 맞추어서, 즉 IO, Lang 등과 같이 클래스틀이 구분뒤어서 디렉토리별로 정리가 되어 있다.
모든 클래스는 반드시 하나의 클래스에 포함되어야 한다. 즉, 각 클래스의 디렉토리 구조가 정해져 있다. 그래서 패키지란? 물리적으로 클래스를 포함하는 하나의 디렉토리이다.
패키지를 선언(디렉토리 위치 선언)하는 것은 아주 간단하다. 클래스나 인터페이스의 소스파일(.
| package 패키지명; |
위와 같은 패키지 선언문은 반드시 소스파일에서 주석과 공백을 제외한 첫 번째 문장이어야 하며, 하나의 소스파일에 단 한번만 선언될 수 있다. 해당 소스파일에 포함된 모든 클래스나 인터페이스는 선언된 패키지에 속하게 된다. 패키지명은 대소문자를 모두 허용하지만, 클래스명과 쉽게 구분하기 하기위해서 소문자로 하는 것을 원칙으로 하고 있다.


이렇게 컴파일된 클래스를 실행하기 위해서는, 시스템에 이 패키지(클래스)의 위치를 등록해야 한다. 환경변수 classpath에 위치를 등록한다.

실행시에 반드시 클래스의 모든 패키지명을 적어준다.
cf) 클래스 패스를 따로 설정하지 않고, 실행하는 방법
1) JDK 밑의 jre\classes 에 클래스를 추가한다. 또는 jar파일로 압축된경우는 jre\lib\ext 밑에 추가한다.
2) java -cp 패키지위치 지정
모든 클래스는 반드시 하나의 패키지에 포함되어야 한다고 했다. 그럼에도 불구하고 소스파일을 작성할 때 패키지를 선언하지 않고도 아무런 문제가 없을 수 있는 이유는 자바에서 기본적으로 제공하는 '이름없는 패키지(unnamed package)' 때문이다.
2. import란?
소스코드를 작성할 때 다른 패키지의 클래스를 사용할 때는 패키지명이 포함된 이름을 사용해야한다. 하지만, 매번 패키지명을 붙여서 작성하기란 여간 불편한 일이 아닐 것이다. 클래스의 코드를 작성하기 전에 import문으로 사용하고자 하는 클래스의 패키지를 미리 명시해주면 소스코드에 사용되는 클래스이름에서 패키지명은 생략할 수 있다.
import문의 역할은 컴파일러에게 소스파일에 사용된 클래스의 패키지에 대한 정보를 제공하는 것이다. 컴파일 시에 컴파일러는 import문을 통해 소스파일에 사용된 클래스들의 패키지를 알아 낸 다음, 모든 클래스이름 앞에 패키지명을 붙여 준다.
import문을 선언하는 방법은 다음과 같다.
| import 패키지명.클래스명; 또는 import 패키지명.*; |
키워드import와 패키지명을 생략하고자 하는 클래스의 이름을 패키지명과 함께 써주면 된다. 같은 패키지에서 여러 개의 클래스가 사용될 때, import문을 여러 번 사용하는 대신 '패키지명.*'을 이용해서 지정된 패키지에 속하는 모든 클래스를 패키지명 없이 사용할 수 있다.
1. Ant란?
유닉스(리눅스)상에서 C/C++ 개발을 해본사람들은, makefile과 유사하다는 것을 알수 있다. 즉, Ant는 빌드 구성을 관리하는 빌드툴이다. 다른 점이라면, makefile은 text로 관리되지만, Ant는 xml로 관리된다는 것이다. 이러한 툴은 개발을 하다보면, 너무나 필요함을 느끼게 되고, 또한 관리적인 문제로 보았을때도 숙지가 되어야 한다.
2. Ant 설치
Download URL : http://ant.apache.org/bindownload.cgi
2-1) 압축해제

2-2) 환경변수 설정


3. ant 설치 확인


4. build.xml 파일 만들기
이제 모든 환경적인 준비는 완료, 그렇다면 makefile 만들듯이, build.xml을 만들고, 규칙에 익숙해지자.
[source : http://ant.apache.org/manual/tutorial-HelloWorldWithAnt.html]
Tutorial: Hello World with Apache Ant
This document provides a step by step tutorial for starting
Content
- Preparing the project
- Enhance the build file
- Enhance the build file
- Using external libraries
- Resources
Preparing the project
We want to separate the source from the generated files, so our java source files will be in src folder. All generated files should be under build, and there splitted into several subdirectories for the individual steps:
We have to create only the src directory. (Because I am working on Windows, here is the win-syntax - translate to your shell):
md src
The following simple Java class just prints a fixed message out to STDOUT, so just write this code into src\oata\HelloWorld.java.
package oata;

public class HelloWorld {
    public static void main(String[] args) {
        System.out.println("Hello World");
    }
}
Now just try to compile and run that:
md build\classes
javac -sourcepath src -d build\classes src\oata\HelloWorld.java
java -cp build\classes oata.HelloWorld
which will result in
Hello World
Creating a jar-file is not very difficult. But creating a startable jar-file needs more steps: create a manifest-file containing the start class, creating the target directory and archiving the files.
echo Main-Class: oata.HelloWorld>myManifest
md build\jar
jar cfm build\jar\HelloWorld.jar myManifest -C build\classes .
java -jar build\jar\HelloWorld.jar
Note: Do not have blanks around the >-sign in the echo Main-Class instruction because it would falsify it!
Four steps to a running application
After finishing the java-only step we have to think about our build process. We have to compile our code, otherwise we couldn't start the program. Oh - "start" - yes, we could provide a target for that. We should package our
By default Ant uses build.xml as the name for a buildfile, so our .\build.xml would be:
<project>

    <target name="clean">
        <delete dir="build"/>
    </target>

    <target name="compile">
        <mkdir dir="build/classes"/>
        <javac srcdir="src" destdir="build/classes"/>
    </target>

    <target name="jar">
        <mkdir dir="build/jar"/>
        <jar destfile="build/jar/HelloWorld.jar" basedir="build/classes">
            <manifest>
                <attribute name="Main-Class" value="oata.HelloWorld"/>
            </manifest>
        </jar>
    </target>

    <target name="run">
        <java jar="build/jar/HelloWorld.jar" fork="true"/>
    </target>

</project>
Now you can compile, package and run the application via
ant compile
ant jar
ant run
Or shorter with
ant compile jar run
While having a look at the buildfile, we will see some similar steps between Ant and the java-only commands:

Enhance the build file
Now we have a working buildfile we could do some enhancements: many time you are referencing the same directories, main-class and jar-name are hard coded, and while invocation you have to remember the right order of build steps.
The first and second point would be addressed with properties, the third with a special property - an attribute of the <project>-tag and the fourth problem can be solved using dependencies.

Now it's easier, just do a ant and you will get
Buildfile: build.xml

clean:

compile:
    [mkdir] Created dir: C:\...\build\classes
    [javac] Compiling 1 source file to C:\...\build\classes

jar:
    [mkdir] Created dir: C:\...\build\jar
      [jar] Building jar: C:\...\build\jar\HelloWorld.jar

run:
     [java] Hello World

main:

BUILD SUCCESSFUL
Using external libraries
Somehow told us not to use syso-statements. For log-Statements we should use a Logging-API - customizable on a high degree (including switching off during usual life (= not development) execution). We use Log4J for that, because
- it is not part of the JDK (1.4+) and we want to show how to use external libs
- it can run under JDK 1.2 (as Ant)
- it's highly configurable
- it's from Apache ;-)
We store our external libraries in a new directory lib. Log4J can be downloaded [1] from Logging's Homepage. Create the lib directory and extract the log4j-1.2.9.jar into that lib-directory. After that we have to modify our java source to use that library and our buildfile so that this library could be accessed during compilation and run.
Working with Log4J is documented inside its manual. Here we use the MyApp-example from the Short Manual [2]. First we have to modify the java source to use the logging framework:
package oata;

import org.apache.log4j.Logger;
import org.apache.log4j.BasicConfigurator;

public class HelloWorld {
    static Logger logger = Logger.getLogger(HelloWorld.class);

    public static void main(String[] args) {
        BasicConfigurator.configure();
        logger.info("Hello World");          // the old SysO-statement
    }
}
Most of the modifications are "framework overhead" which has to be done once. The blue line is our "old System-out" statement.
Don't try to run ant - you will only get lot of compiler errors. Log4J is not inside the classpath so we have to do a little work here. But do not change the CLASSPATH environment variable! This is only for this project and maybe you would break other environments (this is one of the most famous mistakes when working with Ant). We introduce Log4J (or to be more precise: all libraries (jar-files) which are somewhere under .\lib) into our buildfile:
<project name="HelloWorld" basedir="." default="main">
    ...
    <property name="lib.dir"     value="lib"/>

    <path id="classpath">
        <fileset dir="${lib.dir}" includes="**/*.jar"/>
    </path>

    ...

    <target name="compile">
        <mkdir dir="${classes.dir}"/>
        <javac srcdir="${src.dir}" destdir="${classes.dir}" classpathref="classpath"/>
    </target>

    <target name="run" depends="jar">
        <java fork="true" classname="${main-class}">
            <classpath>
                <path refid="classpath"/>
                <path location="${jar.dir}/${ant.project.name}.jar"/>
            </classpath>
        </java>
    </target>

    ...

</project>
In this example we start our application not via its Main-Class manifest-attribute, because we could not provide a jarname and a classpath. So add our class in the red line to the already defined path and start as usual. Running ant would give (after the usual compile stuff):
[java] 0 [main] INFO oata.HelloWorld - Hello World
What's that?
- [java] Ant task running at the moment
- 0 sorry don't know - some Log4J stuff
- [main] the running thread from our application
- INFO log level of that statement
- oata.HelloWorld source of that statement
- - separator
- Hello World the message
Configuration files
Why we have used Log4J? "It's highly configurable"? No - all is hard coded! But that is not the debt of Log4J - it's ours. We had coded BasicConfigurator.configure(); which implies a simple, but hard coded configuration. More confortable would be using a property file. In the java source delete the BasicConfiguration-line from the main() method (and the related import-statement). Log4J will search then for a configuration as described in it's manual. Then create a new file src/log4j.properties. That's the default name for Log4J's configuration and using that name would make life easier - not only the framework knows what is inside, you too!
log4j.rootLogger=DEBUG, stdout

log4j.appender.stdout=org.apache.log4j.ConsoleAppender

log4j.appender.stdout.layout=org.apache.log4j.PatternLayout
log4j.appender.stdout.layout.ConversionPattern=%m%n
This configuration creates an output channel ("Appender") to console named as stdout which prints the message (%m) followed by a line feed (%n) - same as the earlier System.out.println() :-) Oooh kay - but we haven't finished yet. We should deliver the configuration file, too. So we change the buildfile:
    ...
    <target name="compile">
        <mkdir dir="${classes.dir}"/>
        <javac srcdir="${src.dir}" destdir="${classes.dir}" classpathref="classpath"/>
        <copy todir="${classes.dir}">
            <fileset dir="${src.dir}" excludes="**/*.java"/>
        </copy>
    </target>
    ...
This copies all resources (as long as they haven't the suffix ".java") to the build directory, so we could start the application from that directory and these files will included into the jar.
Testing the class
In this step we will introduce the usage of the JUnit [3] testframework in combination with Ant. Because Ant has a built-in JUnit 3.8.2 you could start directly using it. Write a test class in src\HelloWorldTest.java:
public class HelloWorldTest extends junit.framework.TestCase {

    public void testNothing() {
    }

    public void testWillAlwaysFail() {
        fail("An error message");
    }

}
Because we dont have real business logic to test, this test class is very small: just show how to start. For further information see the JUnit documentation [3] and the manual of junit task. Now we add a junit instruction to our buildfile:
    ...

    <target name="run" depends="jar">
        <java fork="true" classname="${main-class}">
            <classpath>
                <path refid="classpath"/>
                <path id="application" location="${jar.dir}/${ant.project.name}.jar"/>
            </classpath>
        </java>
    </target>

    <target name="junit" depends="jar">
        <junit printsummary="yes">
            <classpath>
                <path refid="classpath"/>
                <path refid="application"/>
            </classpath>

            <batchtest fork="yes">
                <fileset dir="${src.dir}" includes="*Test.java"/>
            </batchtest>
        </junit>
    </target>

    ...
We reuse the path to our own jar file as defined in run-target by giving it an ID. The printsummary=yes lets us see more detailed information than just a "FAILED" or "PASSED" message. How much tests failed? Some errors? Printsummary lets us know. The classpath is set up to find our classes. To run tests the batchtest here is used, so you could easily add more test classes in the future just by naming them *Test.java. This is a common naming scheme.
After a ant junit you'll get:
...
junit:
    [junit] Running HelloWorldTest
    [junit] Tests run: 2, Failures: 1, Errors: 0, Time elapsed: 0,01 sec
    [junit] Test HelloWorldTest FAILED

BUILD SUCCESSFUL
...
We can also produce a report. Something that you (and other) could read after closing the shell .... There are two steps: 1. let <junit> log the information and 2. convert these to something readable (browsable).
    ...
    <property name="report.dir"  value="${build.dir}/junitreport"/>
    ...
    <target name="junit" depends="jar">
        <mkdir dir="${report.dir}"/>
        <junit printsummary="yes">
            <classpath>
                <path refid="classpath"/>
                <path refid="application"/>
            </classpath>

            <formatter type="xml"/>

            <batchtest fork="yes" todir="${report.dir}">
                <fileset dir="${src.dir}" includes="*Test.java"/>
            </batchtest>
        </junit>
    </target>

    <target name="junitreport">
        <junitreport todir="${report.dir}">
            <fileset dir="${report.dir}" includes="TEST-*.xml"/>
            <report todir="${report.dir}"/>
        </junitreport>
    </target>
Because we would produce a lot of files and these files would be written to the current directory by default, we define a report directory, create it before running the junit and redirect the logging to it. The log format is XML so junitreport could parse it. In a second target junitreport should create a browsable HTML-report for all generated xml-log files in the report directory. Now you can open the ${report.dir}\index.html and see the result (looks something like JavaDoc).
Personally I use two different targets for junit and junitreport. Generating the HTML report needs some time and you dont need the HTML report just for testing, e.g. if you are fixing an error or a integration server is doing a job.
1. www.eclipse.org 에서 eclipse를 다운 받는다.
웹에 있는 설치 가이드를 반드시 읽어보기를 추천한다.
http://wiki.eclipse.org/FAQ_Where_do_I_get_and_install_Eclipse%3F
2. JDK or JRE가 설치되어 있지 않다면?
어떤것을 설치할까 고민? 그렇다면 아래 글이 지침이 될것이다.
Sun's Java is available in two main distributions: the Java Runtime Engine (JRE) and the Java Development Kit (JDK). If you are using Eclipse for Java development, the JDK offers several advantages, including the availability of source code for the Java classes. If you are using Eclipse for something other than Java development, the JRE is all you need.
다운로드 : http://www.oracle.com/technetwork/java/index.htmlcf) JDK 결로 설정
제어판->성능,유지관리->시스템 또는 내 컴퓨터->속성->우클릭
==> 고급->환경변수

if you get this problem, Just Clean your the existing project and re-compile, that's it!!!
have met a strange problem when I used Eclipse to create a new Android project today, it remained me “An SDK Target must be specified” and Android SDK targets selection list in “Build Target” window “disappeared”.
Searched by Google, most of answers for this “An SDK Target must be specified” problem showed that I should go to “Windows->Android SDK and AVD Manager” in Eclipse and click on “Installed Packages” and then “Update All”. But that’s not my problem, I have used the Eclipse to program with Android long ago and every thing is OK till today. So I continued to search and finally on the Rowan Crane’s Blog I found the resolved method, it is just to change the font size in Eclipse:
Window / Preferences / General / Appearance / Basic / Colours and Fonts
Change “Text Font” and “Dialog Font” to a smaller value, dropping from 10 to 8 or smaller number maybe helped.
[Source URL : http://blog.rowancrane.com/2009/12/27/eclipse-new-android-project-cant-select-build-type-target]
is caused a good 30 mins head scratching. When creating a new Android project in Eclipse it is not possible to progress past the initial screen as it complains “an SDK target must be specified”. In the window you will see “Build Target” but no box listing your installed Android Versions. The area of the window normally looks something like this.

But for unlucky you, it looks like this.
![]()
Providing you know Eclipse is aware of where your SDKs live, the solution is simply to change the font size in eclipse.
Window / Preferences / General / Appearance / Colours and Fonts
Change “Text Font” and “Dialog Font” to a smaller value, dropping from 10 to 8 helped me.
Now for the rant: The “New Android Test Project” dialogue does not suffer this problem, because there aren’t as many UI elements on screen. It wouldn’t surprise me if this is a simple code error somewhere, exacerbated by the fact that most developers aren’t working on “funny” resolutions, such as my widescreen 13″ XPS M1210 Laptop.
Simply put you’d hope the application would ensure all UI components were properly displayed. At the end of the day such schoolboy-error fiddly problems are what put people off IT and software development. There seem to be a fair few people moaning about this one, so whilst buuuuuuuuugs happen I hope someone somewhere is suitably embarrassed…
[ Monday, January 19, 2010]
http://www.androgamez.com/index.html
[ Saturday, January 16, 2010]
http://developer.android.com/index.html
1. 자바 설치 하기 Java SE Development Kit 6u13 (73 MB)
안드로이드 어플리케이션은 자바 환경을 기반으로 개발할 수 있습니다. 위 링크를 통해 최신 버전을 다운로드 받아 설치합니다. 안드로이드는 Java SDK 5 혹은 6 이상의 환경이 필요한데 가능한 최신버전을 설치합니다. 현재 최신 버전은 1.6.0_13입니다.

자바 설치가 완료되었다면 시작 - 보조프로그램 - 명령 프롬프트 혹은 시작 - 실행 - cmd 를 실행합니다. 그리고 java -version을 치고 엔터를 누릅니다. 자바가 정상적으로 설치가 완료되었다면 위와 같이 현재 설치된 자바의 버전이 나타납니다.
2. 이클립스 설치하기 Eclipse IDE for Java Developers (85 MB)
이클립스는 자바를 개발하기 위한 IDE(개발 도구) 입니다. 이클립스에서는 안드로이드 개발을 위한 플러그인을 제공해 주고 있기 때문에 편리하게 안드로이드 어플리케이션을 개발할 수 있습니다.
이클립스는 압축파일 형태로 배포되는 무료 개발도구 입니다. 따로 설치할 필요없이 마음에 드는 위치에 압출을 풀면됩니다. 그리고 실행파일을 클릭하면 이클립스가 실행됩니다. 단, 위에서 자바가 정상적으로 설치 되어야 이클립스가 잘 동작합니다.
3. 안드로이드 SDK 다운로드 Android 1.5 SDK, Release 1 (168MB)
안드로이드의 핵심! 안드로이드 SDK(Software Development Kit)입니다. 얼마전 1.5버전으로 업그레이드 되었죠. 위 링크를 통해 최신 버전을 다운로드 합니다.
파일은 압축 파일 형태로 되어있습니다. 이클립스 처럼 마음에 드는 폴더에 압축을 풉니다.
4. 이클립스에 안드로이드 개발 툴킷(ADT) 설치
이제 준비는 다 된 상태입니다. 이클립스에 안드로이드 개발환경 플러그인을 추가 해주기만 하면 됩니다. 따로 파일을 다운로드 할 필요없이 이클립스의 소프트웨어 업데이트 기능을 이용합니다.
이클립스를 실행후 Help - Software Updates - Available Software(탭) - Add Site를 실행후 아래와 같이 입력합니다.
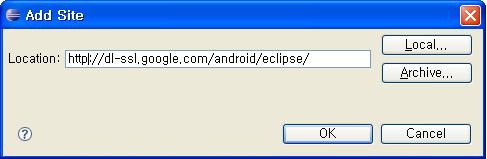
OK를 클릭하면 왼쪽에 싸이트가 추가되고 세부 항목으로 Developer Tools가 추가 됩니다. 체크를 하고 오른쪽의 Install버튼을 누릅니다.

이제 설치 진행창이 뜨고 설치가 진행됩니다. 이클립스 오른쪽 아래에 보면 설치 진행 정도를 확인할 수 있습니다. 설치가 끝나고 이클립스를 다시 실행하면 오류 메시지가 뜨는데 안드로이드 SDK을 저장해 놓은 경로를 지정해 줘야 합니다.
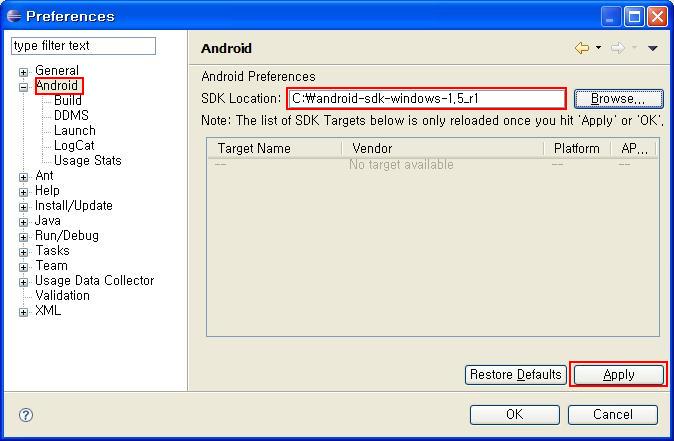
Windows - Preferences - Android에 위에서 압축을 푼 안드로이드 SDK의 위치를 입력합니다.
여기까지 잘 됬다면 이제 설치끝~! ^^
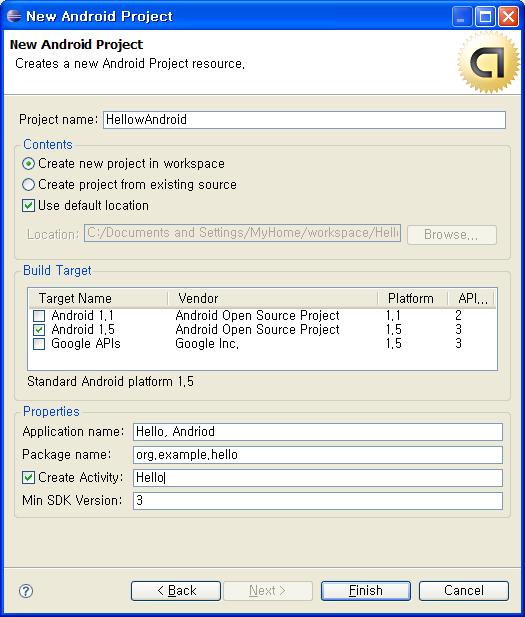
Chap2. HelloAndroid 프로그램 만들기
이제 모든 프로그래밍의 기본 Hello Andriod를 출력하는 프로그램을 실행해 보겠습니다. File - New - Project에서 안드로이드 프로젝트를 선택하고 Next을 클릭합니다. 그리고 다음과 같이 입력합니다.
처음 안드로이드 프로젝트를 실행하게 되면 안드로이드 Virtual Devices가 없다고 새로 만들라고 창이 뜹니다. 예전에는 없었는데 새롭게 생긴 기능이군요. 이클립스 상단의 휴대폰 모양의 아이콘을 클릭합니다.
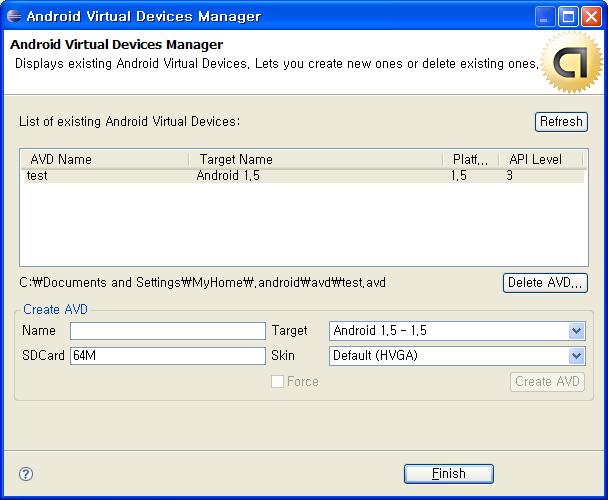
새로운 디바이스를 생성하기 위해 위와 같은 창이 열리면 빈칸을 채워넣습니다. 가상의 휴대폰을 하나 만듣다고 생각하면 될것 같습니다. SDCard는 128K or 64M 범위에서 입력할수 있는게 안드로이드 에뮬레이터 사용할수 있는 SD카드의 용량을 설정해 주는 부분입니다.
빈칸을 모두 채웠다면 꼭 Create AVD 버튼을 클릭해 새로운 디바이스를 생성하세요. 새로운 디바이스가 만들어 졌다면 이제 Finish를 클릭한 다음 새롭게 만든 디바이스를 선택하고 실행하면 됩니다.
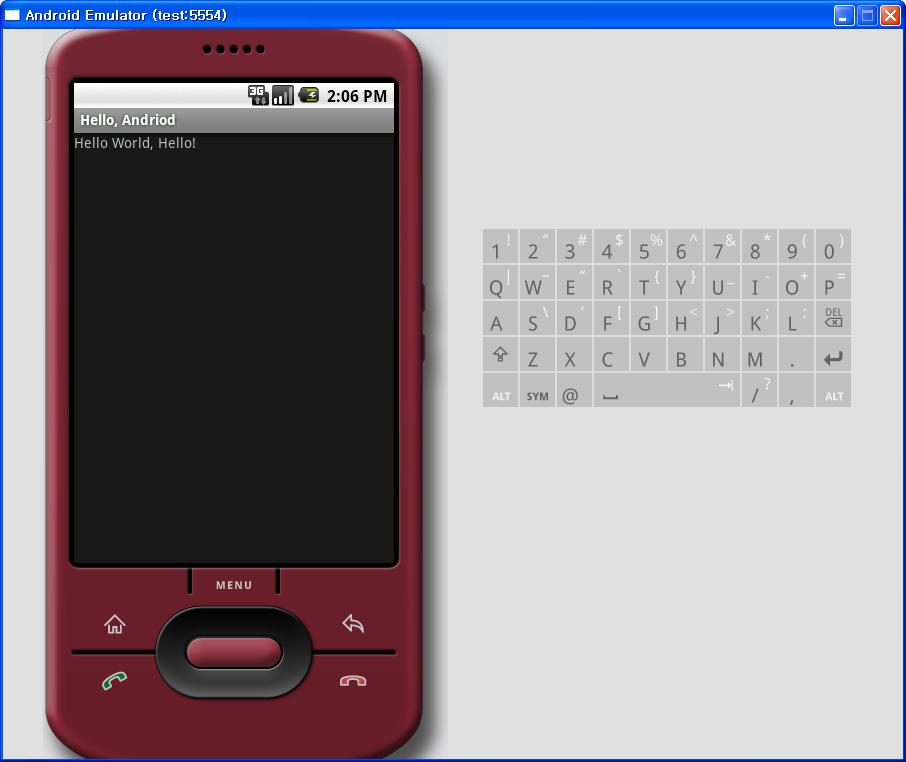
잠시만 기다리면 안드로이드 에뮬레이터가 실행되고 에뮬레이터에서 안드로이드폰가 부팅됩니다. 부팅 시간이 좀 걸립니다. 부팅을 끝나면 Hello World, Hello! 라는 문구가 화면에 보이게 됩니다.
Hello Android가 실행되는 것을 잘 봤다면 이제 에뮬레이터 버튼을 이것저것 눌러보면서 에뮬레이터 구경한번 해보세요. 재미있는것들 많이 있습니다. 인터넷도 됩니다. 구글맵도 구셩해보고 웹싸이트도 가보세요. 한가지 팁을 드리면 Crtl + F11을 누르면 휴대폰이 옆으로 누은 모습이 됩니다.
이 내용은 헬로 안드로이드라는 책을 참고해서 작성했습니다. 학교 졸업 프로젝트 안드로이드 어플리케이션을 선택해서 이것저것 공부중에 있습니다. 앞으로 유용한 정보있으면 계속 정리해서 올릴께요~
[Source URL: http://bzt-inside.tistory.com/ ]
자바를 처음 공부하면서, 위의 세단어(J2SE,J2EE,J2ME)에 대한 개념이 명확하지 않아 고생(?)했던 기억이 있다. 사람마다 개념을 잡기 위한 다양한 방법이 있겠지만, 내 경우는 그 개념이 적용되는 환경(?)을 바라보는게 가장 분명하고, 실수가 없다고 판단한다.
Java는 아래의 세가지 범주로 구분된다.
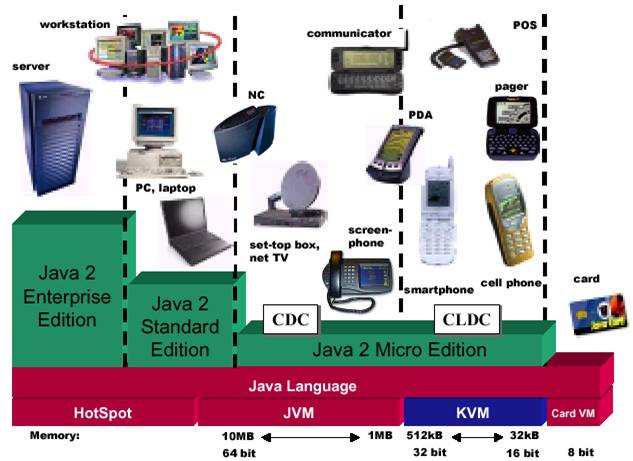
위의 그림을 보면, 각각에 대한 용도를 명확하기 구분할수 있게 된다.
이제 각각의 기능에 대해서 좀더 자세하게 보자.
1. J2SE(Java 2 Standard Edition)
- Java언어를 통한 개발, Compile, 그리고 실행할수 있는 환경을 제공하는 플랫폼이다.
이때 개발할수 있는 종류는 Application, Applet, Swing and Component이고, 이러한 것들이
구동될수 있는 RE(Runtime Environment)를 제공한다.
- J2SE는 어떠한 자바 프로그램을 개발하더라도, 무조건 설치되어야 함은 당연하며, SDK, RE,
Plugin등으로 구성되어 있다
- J2SE와 JDK의 차이
J2SE이전에 JDK가 사용되었으며, J2SE안에 JDK가 포함되어 있으며, 추가적으로 필요한 기능 (RE등)도 포함되어 있다.
- RE는 Java프로그램의 실행환경을 말한다.
- Plugin은 Web브라우저에서 구동되는 동적 모듈 프로그램으로서, Java Applet의 실행환경이다.
- JRE와 J2SE차이
| JRE (Java Runtime Environment) |
J2SE (Java 2 Platform, Standard Edition) | |
| 사용 대상 | Java 기술을 사용하여 개발된 애플릿 및 응용 프로그램을 실행하는 컴퓨터 사용자 | Java 기술을 사용하여 애플릿 및 응용 프로그램을 개발하는 소프트웨어 개발자 |
| 정의 | Java 프로그래밍 언어로 작성된 애플릿 및 응용 프로그램을 실행하는 데 필요한 환경 | Java 프로그래밍 언어로 작성된 애플릿 및 응용 프로그램을 개발하는 데 사용하는 소프트웨어 개발 키트 |
| 수령 방법 | 다음 사이트에서 무료로 받을 수 있습니다. http://java.com |
다음 사이트에서 무료로 받을 수 있습니다. http://java.sun.com/j2se |
( 출처 : www.java.com )
2. J2EE(Java 2 Enterprise Edition)
- 웹 어플리케이션을 개발하기 위한 라이브러리가 포함되어 있다. 즉 J2SE외에 (웹 )서버사이드
프로그 램을 개발하기 위한 것들로, EJB, Servlet, JSP 등을 개발하기 위해서 필요한다.
또한 EJB container/Web container/ 그외 툴이 포함되어져 있다.
3. J2ME(Java 2 Micro Edition)
- 휴대폰/PDA/ 가전제품 등 임베디드 디바이스 환경에서 자바를 개발하기 위한 환경이다.