반응형

방법은 여러가지가 있겠지만, 대용량 분산과 QoS를 합리적 로직으로 풀어낸 부분이 너무나 마음에 드는 구조이고, service architecture는 개인적인 경험으로 봤을 때, 인증/권한 architecture중의 하나인 PKI Infrastructure와 유사해 보인다.

 Google Kenya and the Google Global Cache

Google is well known for snatching up top-level talent, this holds true in Kenya as well. ICT groundbreaker Joe Mucheru heads up the Kenya office, and he’s surrounded by a team of smart young technologists. I had the chance to meet Isis Nyong’o (Strategic Parter Development Manager) while getting ready for Barcamp Nairobi, and then Chris Kiagiri (Tech Lead) and Mark de Blois (Geographic Supervisor) last week before I left.

Google Kenya is Different

I found out a couple of interesting points that make the Google Kenya office even more interesting than before. It turns out that there are 3 offices in Africa; Kenya, South Africa and Egypt. However, the office in Kenya is neither a sales office nor an engineering office, which makes it unique globally. In fact, it is the only “deployment office” worldwide. This means that the Kenya office can be used as a launch point for new ideas and is the central focal point for Google’s Africa strategy.

It came down to a choice between Senegal and Kenya – one French-speaking and one English-speaking, and both with a fairly well developed technology sector. Senegal had a direct transatlantic cable, but Kenya had the right people available. At Google it seems, finding the right personnel usually trumps about everything else.

Speaking of which, they’re still looking for the right people, not only in Senegal, but also in Nigeria, Ghana, Rwanda, Tanzania and Uganda. Unfortunately, Google HR seems to be geographically challenged, as jobs in Egypt are somehow not in Africa…

Dealing with a Slow Internet in Africa

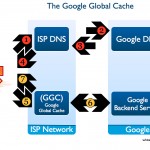
The Google Global Cache (GGC) was announced in May at the African Network Operators Group (AFNOG) conference in Morocco. In lieu of data centers in Africa, Google has created a strategy that is housed at major exchange points to serve Africa at the edge of Google’s network. Internal tests suggested at least 20% performance increase in high latency links, like East Africa.


[The top cycle (1,2,3 & 4) is how things normally work. The bottom cycle (5,6 &7) is where the changes are.]

It works like this. Once anyone within that exchange point’s sphere visits a webpage, the information is cached and it becomes much faster for anyone else visiting that website to access it. Pre-fetching of data also that improves performance over time, even for dynamic content.

This is an interesting strategy. It’s a win for ISP’s (less international traffic means lower costs), a win for end users (pages load faster), and a win for Google (faster, better usage).

The pilot in Africa was turned on in Kenya just 2 weeks ago. There are 17 international exchange points (IXP) in 15 African nations, so with a positive pilot in Kenya, this could soon be seen continent-wide.

Keep your ears open, there are hints of even more interesting stuff coming out of the Google Kenya office.

LG U+ 가입자의 경우 LG U+ Google Cache로 부터 어떤 흐름으로 동영상이 다운로드 되는지 설명드리도록 하겠습니다. 먼저 LG U+ Google Cache내에 사용자가 요청한 동영상이 있는 경우(Cache Hit)의 흐름을 알아보고, 이후 동영상이 없는 경우(Cache Miss)의 흐름에 대해서 살펴 보도록 하겠습니다.


LG U+ 회선을 통한 YouTube 다운로드


(1) LG U+ Google Cache에 동영상이 있는 경우 (Cache Hit)

LG U+ 망 내부에(LG U+ IDC;Internet Data Center에) Google Cache가 들어 있다는 점 외에는 지난 시간의 KT 그림과 동일한 구성입니다.


1.LG U+ 가입자가 브라우져에서 www.youtube.com을 입력하고, 단말에서 LG U+ DNS 서버로 DNS Query를 보냅니다. 반드시 LG U+ DNS일 필요는 없습니다. 어떤 DNS 서버이든 상관 없습니다.
2.그리고 LG U+ DNS는 YouTube 서버 주소 74.125.71.136을 가입자 단말로 전달합니다.
3.가입자는 Avatar 동영상을 클릭합니다.
4.이제 HTTP GET을 통해 Avatar 동영상 요청 메시지가 YouTube 서버로 전달됩니다.
5.이 대목이 아주 중요하니다! HTTP GET 메시지를 받은 YouTube 서버는 단말의 IP 주소 대역을 확인합니다. 이 경우 동영상을 요청한 가입자의 IP 주소 대역이 LG U+입니다. 그러면 YouTube 서버는 LG U+내에 위치한 Google Cache를 선택하여
6.그 hostname(o-o.preferred.lgupluswireline-gmp1.v9.lscache5.c.youtube.com)을 가입자 단말로 전달합니다.
7.가입자 단말은 hostname에 대한 DNS Query를 하고 (역시 DNS 서버가 LG U+ 일 필요는 없음)
8.그 응답으로 IP 주소 61.36.166.12를 받아 옵니다. 이 주소는 LG U+ 내의 Google Cache 주소입니다.
9.이제 단말에서 LG U+ Google Cache로 Avatar 동영상을 요청하고
10.여기서 또 중요! LG U+ Google Cache는 다시 HTTP GET을 보낸 단말의 IP 주소 대역을 확인합니다. 만약 이 주소 대역이 LG U+ 가입자 대역이 아니면 HTTP 302 Found 메시지를 단말로 보내어 미국에 있는 Google Cache로 붙도록 합니다(HTTP Redirect). 즉, 내 가입자 아니면 안받아 주겠다는 거죠. 위 경우는 LG U+ 가입자이므로 밑에 11번 단계로 넘어가게 됩니다.
11.이제 LG U+ Google Cache는 가입자가 요청한 동영상(Avatar)이 나한테 있는지(storage에 있는지) 확인합니다. 다행히 있습니다! (Cache Hit)
12.따라서 LG U+ Google Cache는 동영상을 가입자 단말로 전달합니다. RTT 10ms 이하입니다. 무지 빠르게 가입자 단말로 동영상이 전달됩니다

(2) LG U+ Google Cache에 동영상이 없는 경우 (Cache Miss)

이번 그림에서는 설명을 단순화 하기 위해 DNS flow는 제외 시켰습니다.


(2) LG U+ Google Cache에 동영상이 없는 경우 (Cache Miss)

이번 그림에서는 설명을 단순화 하기 위해 DNS flow는 제외 시켰습니다.


1.LG U+ 가입자가 YouTube 웹페이지에서 Avatar 동영상을 클릭합니다.
2.가입자 단말은 HTTP Get 메시지를 YouTube 서버로 보내고
3.YouTube 서버는 단말의 IP 주소를 확인하고, LG U+ 가입자 이므로
4.LG U+ Google Cache hostname(o-o.preferred.lgupluswireline-gmp1.v9.lscache5.c.youtube.com)을 단말로 전달합니다.
5.가입자 단말은 이제 LG U+ Google Cache로 Avatar 동영상을 요청하고,
6.LG U+ Google Cache가 단말 IP 주소를 확인하였더니 자사 가입자입니다.
7.이제 가입자가 요청한 Avatar 동영상의 캐싱 여부를 확인합니다. 그런데 그 동영상이 없습니다! (Cache Miss)
8.이제부터 시험을 통해 확인된 내용과 일부 추측을 기반으로 설명을 드리겠습니다. LG U+ Google Cache는 Avatar 동영상이 미국내 어느 Google Cache에 들어 있는지 알길이 없을 것 같습니다. 따라서 미리 configuration되어 있는 상위 Google Cache 서버로 HTTP Redirection을 시킵니다. 시험으로 확인하 결과 아래와 같이 hostname의 숫자값이 동일한 매핑 규칙을 발견할 수 있었습니다. 즉
•LG U+ Google Cache "o-o.preferred.lgupluswireline-gmp1.v9.lscache5.c.youtube.com"의 상위 Cache 서버는 -> 미국에 "v9.nonxt5.c.youtube.com"
•LG U+ Google Cache "o-o.preferred.lgupluswireline-gmp1.v12.lscache6.c.youtube.com"의 상위 Cache 서버는 -> 미국에 "v12.nonxt6.c.youtube.com"
9.가입자 단말은 LG U+ Google Cache가 알려준 v9.nonxt5.c.youtube.com으로 Avatar 동영상을 요청하고,
10.이 서버에도 해당 동영상이 없으면 다시 redirector.c.youtube.com으로 HTTP Redirection을 합니다. 추측컨데 redirector.c.youtube.com이 최상위에 위치한 서버로써 모든 동영상의 위치(어느 Cache 서버에 그 동영상이 있는지)를 관리하는 듯 합니다.
11.가입자 단말은 redirector.c.youtube.com으로 Avatar 동영상을 요청하고,
12.드디어 Avatar 동영상이 위치해 있는 Google Cache 서버의 hostname(o-o.preferred.lax04t01.v1.lscache6.c.youtube.com)을 받아 옵니다.
13.가입자 단말은 그 hostname으로 Avatar 동영상을 요청하고,
14.미국에 있는 Google Cache로 부터 동영상을 다운로드 받습니다.


여기서 그럼 LG U+ Google Cache 서버는 언제 Cache Fill을 하나? 라는 의문이 생기는데요. Cache Miss가 난 이후 다시 동일 동영상을 요청해 봤지만 여전히 미국에 있는 Google Cache로부터 다운로드 받는 것으로 보아, 각 Google Cache에는 "동일 컨텐츠를 몇번 이상 요청하면 Cache Fill한다"라는 식의 정책이 들어 있는 것으로 추측이 됩니다.

결언

위와 같이 미국에 있는 YouTube 서버 및 LG U+에 도입된 Google Cache는 HTTP GET 메시지을 보낸 단말 IP 주소 대역을 확인하여 어느 지역의 Google Cache를 통해 다운로드 받게 할지 결정합니다. 즉, KT 가입자는 KT IP 주소 대역을 사용하므로 DNS만 LG U+로 변경한다 해서 LG U+ Google Cache에 접속할 수는 없습니다. (그렇다고 KT 가입자가 단말의 IP 주소를 LG U+ 대역으로 바꾸면 라우팅이 안되어 아예 인터넷을 사용할 수 없게 되구요.)
이 말은 곧, LG U+ 가입자가 KT DNS를 사용해도 아무 문제 없이 LG U+ Google Cache를 통해 동영상을 다운로드 받게 됩니다.


마지막으로 한가지 더 말씀드리자면...
저희 회사가 LG U+ 기업용 회선을 사용하고 있습니다. 회사에서 확인을 해 보니, LG U+ 기업용 회선 가입자의 경우 LG U+ Google Cache로 부터 동영상 다운로드가 안되고, 그래도 RTT가 좀 짧은(100ms 정도) 홍콩에 위치한 Google Cache(o-o.preferred.hkg05s01.v20.lscache7.c.youtube.com)로 부터 동영상을 다운로드 받음을 확인하였습니다.
즉, 미국에 있는 YouTube 서버는
     1) LG U+ 홈 가입자 IP 대역이면 LG U+ Google Cache를 선정해 주고
     2) LG U+ 기업용 가입자 IP 대역이면 홍콩에 위치한 Google Cache를 선정
     3) 나머지 경우(예. KT IP 대역이면) 미국에 위치한 Google Cache를 선정

[소스:http://whiteafrican.com/2008/07/04/google-kenya-and-the-google-global-cache/}

[소스:http://www.netmanias.com/bbs/view.php?id=blog&no=301'

반응형
posted by choiwonwoo
:
반응형

요즘 각 개발 회사마다 Global Service를 고민하면서 서비스를 기획 및 개발하고 있다. 이 때마다, 항상 고민이 되는 부분은 분산(서비스/데이타) 과 QoS 부분이다. 분산을 높이면, QoS가 낮아지는 현상이 발생하게 된다.(반대 경우도 마찬가지..) 그래서, 아이디어를 찾다가, Google과 Netflix는 어떻게 되어 있나 궁금해서 아래의 자료를 발견했는데, 매우 유용하다고 생각되어 기재합니다.

[OTT Cache(Google, Netflix)와 통신사업자 Transparent Cache - I]

Sandvine사의 Report에 따르면 2012년 하반기 북미 전체 인터넷 트래픽의 33%가 Netflix이고 15%가 YouTube로 이 두 회사의 트래픽만 합쳐도 전체의 48%로 거의 절반에 이른다. 통신사업자의 IP 네트워크는 인터넷이 아니라 두 회사의 비디오 전달망이 된 것이다.
이 두 회사의 이용자수는 계속 증가하고 있고 또한 갈수록 비디오 품질이 고화질화되어 트래픽량 (즉, 전달 비용)이 지속적으로 증가하고 있다. 통신사업자와 OTT는 각각 서로 다른 비용 최소화 전략을 취하고 있는 데 본 블로그에서는 먼저 OTT의 전략들을 살펴보기로 하자.


Google의 CDN 전략

Google은 미국과 유럽, 아시아에 13개(Google이 공식적으로 확인해준 데이터센터만 13개)의 자체 데이터 센터와 자체 CDN을 통해 YouTube 트래픽을 전세계에 전달한다. 이 소수의 데이터센터만으로는 급증하는 YouTube 트래픽을 감당하기 어렵고 또한  Google 데이터센터가 구축되어 있지 않는 나라에서는 YouTube 비디오 시청시 잦은 버퍼링이 발생하는 문제가 발생한다.
이를 해결하기 위해 Google은 2008년경부터 Google Global Cache (GGC)라는 자체 에지 서버를 통신사업자에게 무상으로 제공해주고 있다. Google은 GGC 서버 (H/W and S/W)를 통신사업자의 IDC에 설치해주고 서버 운영도 Google이 한다(원격 관리). 통신사업자는 IDC내 랙공간과 전력, GE 포트를 역시 돈을 받지 않고 Google에 제공해준다.
통신사업자는 외부망에서 유입되어오는 YouTube 트래픽이 대폭 줄어드므로 Transit 비용을 절감할 수 있고 자사 인터넷 가입자들의 "왜 다른 ISP는 YouTube가 빠른 데 우리만 느리냐?"라는 불만을 잠재울 수 있어 좋다.Google은 YouTube 이용자의 QoE를 향상시키고 보다 고화질의 비디오 서비스를 IDC 요금 걱정없이 제공할 수 있어 좋다. 서로 이득이 있으므로 서로 돈을 내지 않는다. 북미와 유럽의 대부분의 통신사업자들이 GGC를 도입하였고 우리나라도 작년 2월에 SK, LG U+, KINX에 도입되었다.
YouTube라는 기가막힌 컨텐츠를 가진 Google은 이렇게 자기 돈 안들이고 전세계 통신사업자의 망내까지 자기 CDN을 확장시키고 있다.  


Netflix의 CDN 전략

유료 가입자수가 3천만이 넘고 북미 인터넷 트래픽의 33%를 발생시키고 있는 Netflix도 Google과 동일한 전략을 취하고 있다. 하나씩 살펴보자. Netflix는 자사의 비디오를 이용자에게 전달해주기 위해 Akamai와 Limelight, Level3로부터 CDN 서비스를 받고 있고 이들에게 CDN 이용료를 지불하고 있다.
Netflix는 CDN 사업자에게 지출하는 CDN 요금이 아깝고 또 지금보다 고화질인 Full HD급의 비디오 서비스를 제공하여 보다 많은 가입자를 유치하고 싶은 데 이럴려면 CDN 사업자들에게 지금보다 더 많은 CDN 이용료를 내야 한다.
그런데 옆집을 보니 Google이 GGC를 통신사업자에게 돈 안 내고 밀어 넣고 있고 있네 ! 어 그러면 우리도 컨텐츠의 킹이니, Google처럼 하자- 하여 2012년 6월에 나온 게 Netflix Cache이다.

Netflix Cache도 GGC와 마찬가지로 OTT인 Netflix가 자체 개발한 서버로 통신사업자에게 무상으로 제공해주고 운영도 Netflix가 한다. 통신사업자는 IDC내 랙공간과 전력, GE 포트를 역시 돈을 받지 않고 Netflix에 제공해준다.
현재 미국의 Cablevision, Google Fiber, Clearwire, 캐나다의 Telus, 영국의 BT, Virgin Media, 덴마크의 TDC 그리고 중남미의 Telmex와 GVT에 Netflix Cache가 도입되어 있다(Netflix 서비스 국가). 특히 유럽의 경우는  모든 Netflix 트래픽의 글로벌 CDN이 아닌 Netflix Cache를 통해 이용자에게 전달된다.
Netlfix는 올해 1월 Full HD 화질 서비스(1920x1080, 5~7Mbps)와 3D 비디오 서비스(12Mbps)를 개시했다. Netflix 가입자는 추가 요금없이 고화질 서비스를 이용할 수 있다.  재미있는 것은 이 고화질 서비스가 Netflix Cache가 도입된 통신사업자의 가입자에게만 제공된다는 점이다.
통신사업자의 Netflix Cache 도입을 촉진시키려는 (그럼으로써 CDN 요금을 절감시키고 통신사업자에게 IDC 요금도 안내면서 고화질 서비스를 제공하려는) 의도이다.

 이 서비스가 출시되자 Time Warner Cable은 Netflix Cache가 도입되지 않은 통신사업자의 가입자에게도 동일하게 Full HD와 3D 서비스를 제공해야 한다며 불만을 터트리고 있다.
그 동안은 통신사업자의 망중립성에 대한 논쟁이 활발했는 데 꺼꾸로 OTT가 통신사업자별로 컨텐츠를 차별적으로 제공하면 안되지 않느냐는 컨텐츠 중립성 이슈가 나온 것이다.
칼자루가 통신사업자에서 OTT로 넘어간...

하여튼 Netflix도 Google과 마찬가지로 자기 돈 안들이고 세계 각국의 통신사업자의 망내까지 자기 CDN을 확장시키고 있다.
대표적인 OTT인 YouTube와 Netflix가 자신들의 막강한 컨텐츠, 이용자 수를 무기로 자기 Cache를 각국의 통신사업자망내에 진입시키고 있다. 한편 걱정스러운 것은 OTT의 트래픽을 통신사업자망내에 캐싱하여 네트워크 비용을 줄이고 신규 수익원을 만들려고 생겨난 통신사업자 CDN과 Transparent Cache의 시장이 축소될 수 있다는 점이다.
통신사업자 CDN과 Transparent Cache는 국내외 벤더들이 개발하여 통신사업자에게 공급함으로써 벤더들에게 매출 발생의 희망이 있고 또 통신사업자도 망내 CDN을 구축하여 OTT로부터 CDN 이용료를 받을 수 있지만 YouTube와 Netflix가 자사의 Cache를 통신사업자망에 밀어넣으면 OTT를 빼고는 아무도 돈 버는자는 없다.


[소스: http://www.netmanias.com/bbs/view.php?id=blog&no=367]


반응형
posted by choiwonwoo
:
Focusing on .../Java 2011. 3. 12. 04:02
반응형
1. Ivy란?
- Apache Ivy is a popular dependecny manager focusing on flexibility and simplicity.

2. 설치
- download url : http://ant.apache.org/ivy/download.cgi


- 언제나 그렇지만, 자기를 읽어달라는 파일이 있다. 당연히 봐야겠지^^
  "Please read doc/install.html for installation instructions."
   문서를 보면 이런 문구를 발견, 당연히 다음 스테이지는..고.
- 다음 지시사항을 하달 받음
지시대로 ivy.jar를 복사하고, 지시대로 hello를 해보자.


성공적으로 설치 되었다는 메시지를 확인했다.
반응형
posted by choiwonwoo
:
Focusing on .../Java 2011. 3. 10. 10:30
반응형

1. Package란?
패키지란, 클래스 또는 인터페이스의 묶음이다. 왜? 사용자(개발자)들이 사용하기 편하게 하기 위해서이다. 관련된것끼리 잘 묶어 놓았다. 

그런데 어떻게?
클래스가 물리적으로 하나의 클래스파일(.class)인 것과 같이 패키지는 물리적으로 하나의 디렉토리이다.


위의 화면을 보면, 각각의 클래스는, 각 기능별 의미에 맞추어서, 즉 IO, Lang 등과 같이 클래스틀이 구분뒤어서 디렉토리별로 정리가 되어 있다.

모든 클래스는 반드시 하나의 클래스에 포함되어야 한다. 즉, 각 클래스의 디렉토리 구조가 정해져 있다. 그래서 패키지란? 물리적으로 클래스를 포함하는 하나의 디렉토리이다.


패키지를 선언(디렉토리 위치 선언)하는 것은 아주 간단하다. 클래스나 인터페이스의 소스파일(.java)에서 다음과 같이 한 줄만 적어주면 된다.
package 패키지명;

위와 같은 패키지 선언문은 반드시 소스파일에서 주석과 공백을 제외한 첫 번째 문장이어야 하며, 하나의 소스파일에 단 한번만 선언될 수 있다. 해당 소스파일에 포함된 모든 클래스나 인터페이스는 선언된 패키지에 속하게 된다. 패키지명은 대소문자를 모두 허용하지만, 클래스명과 쉽게 구분하기 하기위해서 소문자로 하는 것을 원칙으로 하고 있다.

소스 파일을 보면, 패키명이 없다. 이런 경우는 compile option에서 지정한 위치에 class 파일을 생성한다.

소스에 패기지명을 지정한대로, 디렉토리와 클래스 파일이 생성된다.

이렇게 컴파일된 클래스를 실행하기 위해서는, 시스템에 이 패키지(클래스)의 위치를 등록해야 한다. 환경변수 classpath에 위치를 등록한다.

실행시에 반드시 클래스의 모든 패키지명을 적어준다.

cf) 클래스 패스를 따로 설정하지 않고, 실행하는 방법
1) JDK 밑의 jre\classes 에 클래스를 추가한다. 또는 jar파일로 압축된경우는 jre\lib\ext 밑에 추가한다.
2) java -cp 패키지위치 지정


모든 클래스는 반드시 하나의 패키지에 포함되어야 한다고 했다. 그럼에도 불구하고 소스파일을 작성할 때 패키지를 선언하지 않고도 아무런 문제가 없을 수 있는 이유는 자바에서 기본적으로 제공하는 '이름없는 패키지(unnamed package)' 때문이다. 


2. import란?
소스코드를 작성할 때 다른 패키지의 클래스를 사용할 때는 패키지명이 포함된 이름을 사용해야한다. 하지만, 매번 패키지명을 붙여서 작성하기란 여간 불편한 일이 아닐 것이다. 클래스의 코드를 작성하기 전에 import문으로 사용하고자 하는 클래스의 패키지를 미리 명시해주면 소스코드에 사용되는 클래스이름에서 패키지명은 생략할 수 있다.

import문의 역할은 컴파일러에게 소스파일에 사용된 클래스의 패키지에 대한 정보를 제공하는 것이다. 컴파일 시에 컴파일러는 import문을 통해 소스파일에 사용된 클래스들의 패키지를 알아 낸 다음, 모든 클래스이름 앞에 패키지명을 붙여 준다.

import문을 선언하는 방법은 다음과 같다.

import 패키지명.클래스명;
또는
import 패키지명.*;

키워드import와 패키지명을 생략하고자 하는 클래스의 이름을 패키지명과 함께 써주면 된다. 같은 패키지에서 여러 개의 클래스가 사용될 때, import문을 여러 번 사용하는 대신 '패키지명.*'을 이용해서 지정된 패키지에 속하는 모든 클래스를 패키지명 없이 사용할 수 있다.

반응형
posted by choiwonwoo
:
Focusing on .../Java 2011. 3. 10. 04:36
반응형

1. Ant란?
유닉스(리눅스)상에서 C/C++ 개발을 해본사람들은, makefile과 유사하다는 것을 알수 있다. 즉, Ant는 빌드 구성을 관리하는 빌드툴이다. 다른 점이라면, makefile은 text로 관리되지만, Ant는 xml로 관리된다는 것이다. 이러한 툴은 개발을 하다보면, 너무나 필요함을 느끼게 되고, 또한 관리적인 문제로 보았을때도 숙지가 되어야 한다.

2. Ant 설치
Download URL : http://ant.apache.org/bindownload.cgi
2-1) 압축해제

2-2) 환경변수 설정


3. ant 설치 확인


4. build.xml 파일 만들기
이제 모든 환경적인 준비는 완료, 그렇다면 makefile 만들듯이, build.xml을 만들고, 규칙에 익숙해지자.

[source : http://ant.apache.org/manual/tutorial-HelloWorldWithAnt.html]

Tutorial: Hello World with Apache Ant

This document provides a step by step tutorial for starting ava programming with Apache Ant. It does not contain deeper knowledge about Java or Ant. This tutorial has the goal to let you see, how to do the easiest steps in Ant.

Content

Preparing the project

We want to separate the source from the generated files, so our java source files will be in src folder. All generated files should be under build, and there splitted into several subdirectories for the individual steps: classes for our compiled files and jar for our own JAR-file.

We have to create only the src directory. (Because I am working on Windows, here is the win-syntax - translate to your shell):

md src

The following simple Java class just prints a fixed message out to STDOUT, so just write this code into src\oata\HelloWorld.java.

package oata;

public class HelloWorld {
    public static void main(String[] args) {
        System.out.println("Hello World");
    }
}

Now just try to compile and run that:

md build\classes
javac -sourcepath src -d build\classes src\oata\HelloWorld.java
java -cp build\classes oata.HelloWorld
which will result in
Hello World

Creating a jar-file is not very difficult. But creating a startable jar-file needs more steps: create a manifest-file containing the start class, creating the target directory and archiving the files.

echo Main-Class: oata.HelloWorld>myManifest
md build\jar
jar cfm build\jar\HelloWorld.jar myManifest -C build\classes .
java -jar build\jar\HelloWorld.jar

Note: Do not have blanks around the >-sign in the echo Main-Class instruction because it would falsify it!

Four steps to a running application

After finishing the java-only step we have to think about our build process. We have to compile our code, otherwise we couldn't start the program. Oh - "start" - yes, we could provide a target for that. We should package our application. Now it's only one class - but if you want to provide a download, no one would download several hundreds files ... (think about a complex Swing GUI - so let us create a jar file. A startable jar file would be nice ... And it's a good practise to have a "clean" target, which deletes all the generated stuff. Many failures could be solved just by a "clean build".

By default Ant uses build.xml as the name for a buildfile, so our .\build.xml would be:

<project>

    <target name="clean">
        <delete dir="build"/>
    </target>

    <target name="compile">
        <mkdir dir="build/classes"/>
        <javac srcdir="src" destdir="build/classes"/>
    </target>

    <target name="jar">
        <mkdir dir="build/jar"/>
        <jar destfile="build/jar/HelloWorld.jar" basedir="build/classes">
            <manifest>
                <attribute name="Main-Class" value="oata.HelloWorld"/>
            </manifest>
        </jar>
    </target>

    <target name="run">
        <java jar="build/jar/HelloWorld.jar" fork="true"/>
    </target>

</project>

Now you can compile, package and run the application via

ant compile
ant jar
ant run

Or shorter with

ant compile jar run

While having a look at the buildfile, we will see some similar steps between Ant and the java-only commands:


Enhance the build file

Now we have a working buildfile we could do some enhancements: many time you are referencing the same directories, main-class and jar-name are hard coded, and while invocation you have to remember the right order of build steps.

The first and second point would be addressed with properties, the third with a special property - an attribute of the <project>-tag and the fourth problem can be solved using dependencies.


Now it's easier, just do a ant and you will get

Buildfile: build.xml

clean:

compile:
    [mkdir] Created dir: C:\...\build\classes
    [javac] Compiling 1 source file to C:\...\build\classes

jar:
    [mkdir] Created dir: C:\...\build\jar
      [jar] Building jar: C:\...\build\jar\HelloWorld.jar

run:
     [java] Hello World

main:

BUILD SUCCESSFUL

Using external libraries

Somehow told us not to use syso-statements. For log-Statements we should use a Logging-API - customizable on a high degree (including switching off during usual life (= not development) execution). We use Log4J for that, because

  • it is not part of the JDK (1.4+) and we want to show how to use external libs
  • it can run under JDK 1.2 (as Ant)
  • it's highly configurable
  • it's from Apache ;-)

We store our external libraries in a new directory lib. Log4J can be downloaded [1] from Logging's Homepage. Create the lib directory and extract the log4j-1.2.9.jar into that lib-directory. After that we have to modify our java source to use that library and our buildfile so that this library could be accessed during compilation and run.

Working with Log4J is documented inside its manual. Here we use the MyApp-example from the Short Manual [2]. First we have to modify the java source to use the logging framework:

package oata;

import org.apache.log4j.Logger;
import org.apache.log4j.BasicConfigurator;

public class HelloWorld {
    static Logger logger = Logger.getLogger(HelloWorld.class);

    public static void main(String[] args) {
        BasicConfigurator.configure();
        logger.info("Hello World");          // the old SysO-statement
    }
}

Most of the modifications are "framework overhead" which has to be done once. The blue line is our "old System-out" statement.

Don't try to run ant - you will only get lot of compiler errors. Log4J is not inside the classpath so we have to do a little work here. But do not change the CLASSPATH environment variable! This is only for this project and maybe you would break other environments (this is one of the most famous mistakes when working with Ant). We introduce Log4J (or to be more precise: all libraries (jar-files) which are somewhere under .\lib) into our buildfile:

<project name="HelloWorld" basedir="." default="main">
    ...
    <property name="lib.dir"     value="lib"/>

    <path id="classpath">
        <fileset dir="${lib.dir}" includes="**/*.jar"/>
    </path>

    ...

    <target name="compile">
        <mkdir dir="${classes.dir}"/>
        <javac srcdir="${src.dir}" destdir="${classes.dir}" classpathref="classpath"/>
    </target>

    <target name="run" depends="jar">
        <java fork="true" classname="${main-class}">
            <classpath>
                <path refid="classpath"/>
                <path location="${jar.dir}/${ant.project.name}.jar"/>
            </classpath>
        </java>
    </target>

    ...

</project>

In this example we start our application not via its Main-Class manifest-attribute, because we could not provide a jarname and a classpath. So add our class in the red line to the already defined path and start as usual. Running ant would give (after the usual compile stuff):

[java] 0 [main] INFO oata.HelloWorld  - Hello World

What's that?

  • [java] Ant task running at the moment
  • 0 sorry don't know - some Log4J stuff
  • [main] the running thread from our application
  • INFO log level of that statement
  • oata.HelloWorld source of that statement
  • - separator
  • Hello World the message
For another layout ... have a look inside Log4J's documentation about using other PatternLayout's.

Configuration files

Why we have used Log4J? "It's highly configurable"? No - all is hard coded! But that is not the debt of Log4J - it's ours. We had coded BasicConfigurator.configure(); which implies a simple, but hard coded configuration. More confortable would be using a property file. In the java source delete the BasicConfiguration-line from the main() method (and the related import-statement). Log4J will search then for a configuration as described in it's manual. Then create a new file src/log4j.properties. That's the default name for Log4J's configuration and using that name would make life easier - not only the framework knows what is inside, you too!

log4j.rootLogger=DEBUG, stdout

log4j.appender.stdout=org.apache.log4j.ConsoleAppender

log4j.appender.stdout.layout=org.apache.log4j.PatternLayout
log4j.appender.stdout.layout.ConversionPattern=%m%n

This configuration creates an output channel ("Appender") to console named as stdout which prints the message (%m) followed by a line feed (%n) - same as the earlier System.out.println() :-) Oooh kay - but we haven't finished yet. We should deliver the configuration file, too. So we change the buildfile:

    ...
    <target name="compile">
        <mkdir dir="${classes.dir}"/>
        <javac srcdir="${src.dir}" destdir="${classes.dir}" classpathref="classpath"/>
        <copy todir="${classes.dir}">
            <fileset dir="${src.dir}" excludes="**/*.java"/>
        </copy>
    </target>
    ...

This copies all resources (as long as they haven't the suffix ".java") to the build directory, so we could start the application from that directory and these files will included into the jar.

Testing the class

In this step we will introduce the usage of the JUnit [3] testframework in combination with Ant. Because Ant has a built-in JUnit 3.8.2 you could start directly using it. Write a test class in src\HelloWorldTest.java:

public class HelloWorldTest extends junit.framework.TestCase {

    public void testNothing() {
    }
    
    public void testWillAlwaysFail() {
        fail("An error message");
    }
    
}

Because we dont have real business logic to test, this test class is very small: just show how to start. For further information see the JUnit documentation [3] and the manual of junit task. Now we add a junit instruction to our buildfile:

    ...

    <target name="run" depends="jar">
        <java fork="true" classname="${main-class}">
            <classpath>
                <path refid="classpath"/>
                <path id="application" location="${jar.dir}/${ant.project.name}.jar"/>
            </classpath>
        </java>
    </target>
    
    <target name="junit" depends="jar">
        <junit printsummary="yes">
            <classpath>
                <path refid="classpath"/>
                <path refid="application"/>
            </classpath>
            
            <batchtest fork="yes">
                <fileset dir="${src.dir}" includes="*Test.java"/>
            </batchtest>
        </junit>
    </target>

    ...

We reuse the path to our own jar file as defined in run-target by giving it an ID. The printsummary=yes lets us see more detailed information than just a "FAILED" or "PASSED" message. How much tests failed? Some errors? Printsummary lets us know. The classpath is set up to find our classes. To run tests the batchtest here is used, so you could easily add more test classes in the future just by naming them *Test.java. This is a common naming scheme.

After a ant junit you'll get:

...
junit:
    [junit] Running HelloWorldTest
    [junit] Tests run: 2, Failures: 1, Errors: 0, Time elapsed: 0,01 sec
    [junit] Test HelloWorldTest FAILED

BUILD SUCCESSFUL
...

We can also produce a report. Something that you (and other) could read after closing the shell .... There are two steps: 1. let <junit> log the information and 2. convert these to something readable (browsable).

    ...
    <property name="report.dir"  value="${build.dir}/junitreport"/>
    ...
    <target name="junit" depends="jar">
        <mkdir dir="${report.dir}"/>
        <junit printsummary="yes">
            <classpath>
                <path refid="classpath"/>
                <path refid="application"/>
            </classpath>
            
            <formatter type="xml"/>
            
            <batchtest fork="yes" todir="${report.dir}">
                <fileset dir="${src.dir}" includes="*Test.java"/>
            </batchtest>
        </junit>
    </target>
    
    <target name="junitreport">
        <junitreport todir="${report.dir}">
            <fileset dir="${report.dir}" includes="TEST-*.xml"/>
            <report todir="${report.dir}"/>
        </junitreport>
    </target>

Because we would produce a lot of files and these files would be written to the current directory by default, we define a report directory, create it before running the junit and redirect the logging to it. The log format is XML so junitreport could parse it. In a second target junitreport should create a browsable HTML-report for all generated xml-log files in the report directory. Now you can open the ${report.dir}\index.html and see the result (looks something like JavaDoc).
Personally I use two different targets for junit and junitreport. Generating the HTML report needs some time and you dont need the HTML report just for testing, e.g. if you are fixing an error or a integration server is doing a job.


반응형
posted by choiwonwoo
:
Focusing on .../Java 2011. 1. 20. 03:43
반응형

1. www.eclipse.org 에서 eclipse를 다운 받는다.
   웹에 있는 설치 가이드를 반드시 읽어보기를 추천한다.
   http://wiki.eclipse.org/FAQ_Where_do_I_get_and_install_Eclipse%3F

2. JDK or JRE가 설치되어 있지 않다면?
   어떤것을 설치할까 고민? 그렇다면 아래 글이 지침이 될것이다.

Sun's Java is available in two main distributions: the Java Runtime Engine (JRE) and the Java Development Kit (JDK). If you are using Eclipse for Java development, the JDK offers several advantages, including the availability of source code for the Java classes. If you are using Eclipse for something other than Java development, the JRE is all you need.

다운로드 : http://www.oracle.com/technetwork/java/index.html

cf) JDK 결로 설정
제어판->성능,유지관리->시스템 또는 내 컴퓨터->속성->우클릭
==> 고급->환경변수
반응형
posted by choiwonwoo
:
Focusing on .../Java 2010. 5. 23. 01:02
반응형

if you get this problem, Just Clean your the existing project  and re-compile, that's it!!!

반응형
posted by choiwonwoo
:
Focusing on .../Java 2010. 5. 23. 00:57
반응형
[Source URL : http://www.cuteandroid.com/tips-for-android-developer-an-sdk-target-must-be-specified]

 have met a strange problem when I used Eclipse to create a new Android project today, it remained me “An SDK Target must be specified” and Android SDK targets selection list in “Build Target” window “disappeared”.

Searched by Google, most of answers for this “An SDK Target must be specified” problem showed that I should go to “Windows->Android SDK and AVD Manager” in Eclipse and click on “Installed Packages” and then “Update All”. But that’s not my problem, I have used the Eclipse to program with Android long ago and every thing is OK till today. So I continued to search and finally on the Rowan Crane’s Blog I found the resolved method, it is just to change the font size in Eclipse:

Window / Preferences / General / Appearance / Basic / Colours and Fonts

Change “Text Font” and “Dialog Font” to a smaller value, dropping from 10 to 8 or smaller number maybe helped.

[Source URL : http://blog.rowancrane.com/2009/12/27/eclipse-new-android-project-cant-select-build-type-target]


is caused a good 30 mins head scratching. When creating a new Android project in Eclipse it is not possible to progress past the initial screen as it complains “an SDK target must be specified”.  In the window you will see “Build Target” but no box listing your installed Android Versions. The area of the window normally looks something like this.

But for unlucky you, it looks like this.

Providing you know Eclipse is aware of where your SDKs live, the solution is simply to change the font size in eclipse.

Window / Preferences / General / Appearance / Colours and Fonts

Change “Text Font” and “Dialog Font” to a smaller value, dropping from 10 to 8 helped me.

Now for the rant: The “New Android Test Project” dialogue does not suffer this problem, because there aren’t as many UI elements on screen. It wouldn’t surprise me if this is a simple code error somewhere, exacerbated by the fact that most developers aren’t working on “funny” resolutions, such as my widescreen 13″ XPS M1210 Laptop.

Simply put you’d hope the application would ensure all UI components were properly displayed. At the end of the day such schoolboy-error fiddly problems are what put people off IT and software development. There seem to be a fair few people moaning about this one, so whilst buuuuuuuuugs happen I hope someone somewhere is suitably embarrassed…

반응형
posted by choiwonwoo
:
Focusing on .../Java 2010. 1. 17. 03:07
반응형

[ Monday, January 19, 2010]
http://www.androgamez.com/index.html
[ Saturday, January 16, 2010]
http://developer.android.com/index.html
반응형
posted by choiwonwoo
:
Focusing on .../Java 2010. 1. 15. 02:59
반응형
Chap1. 안드로이드 개발환경 구축하기

1. 자바 설치 하기
Java SE Development Kit 6u13 (73 MB)

안드로이드 어플리케이션은 자바 환경을 기반으로 개발할 수 있습니다. 위 링크를 통해 최신 버전을 다운로드 받아 설치합니다. 안드로이드는 Java SDK 5 혹은 6 이상의 환경이 필요한데 가능한 최신버전을 설치합니다. 현재 최신 버전은 1.6.0_13입니다.

사용자 삽입 이미지

자바 설치가 완료되었다면 시작 - 보조프로그램 - 명령 프롬프트 혹은 시작 - 실행 - cmd 를 실행합니다. 그리고 java -version을 치고 엔터를 누릅니다. 자바가 정상적으로 설치가 완료되었다면 위와 같이 현재 설치된 자바의 버전이 나타납니다.


2. 이클립스 설치하기 Eclipse IDE for Java Developers (85 MB)

이클립스는 자바를 개발하기 위한 IDE(개발 도구) 입니다. 이클립스에서는 안드로이드 개발을 위한 플러그인을 제공해 주고 있기 때문에 편리하게 안드로이드 어플리케이션을 개발할 수 있습니다.

이클립스는 압축파일 형태로 배포되는 무료 개발도구 입니다. 따로 설치할 필요없이 마음에 드는 위치에 압출을 풀면됩니다. 그리고 실행파일을 클릭하면 이클립스가 실행됩니다. 단, 위에서 자바가 정상적으로 설치 되어야 이클립스가 잘 동작합니다.


3. 안드로이드 SDK 다운로드 Android 1.5 SDK, Release 1 (168MB)

안드로이드의 핵심! 안드로이드 SDK(Software Development Kit)입니다. 얼마전 1.5버전으로 업그레이드 되었죠. 위 링크를 통해 최신 버전을 다운로드 합니다.

파일은 압축 파일 형태로 되어있습니다. 이클립스 처럼 마음에 드는 폴더에 압축을 풉니다.


4. 이클립스에 안드로이드 개발 툴킷(ADT) 설치 

이제 준비는 다 된 상태입니다. 이클립스에 안드로이드 개발환경 플러그인을 추가 해주기만 하면 됩니다. 따로 파일을 다운로드 할 필요없이 이클립스의 소프트웨어 업데이트 기능을 이용합니다.

이클립스를 실행후 Help - Software Updates - Available Software(탭) - Add Site를 실행후 아래와 같이 입력합니다.
사용자 삽입 이미지

OK를 클릭하면 왼쪽에 싸이트가 추가되고 세부 항목으로 Developer Tools가 추가 됩니다. 체크를 하고 오른쪽의 Install버튼을 누릅니다.
사용자 삽입 이미지

이제 설치 진행창이 뜨고 설치가 진행됩니다. 이클립스 오른쪽 아래에 보면 설치 진행 정도를 확인할 수 있습니다. 설치가 끝나고 이클립스를 다시 실행하면 오류 메시지가 뜨는데 안드로이드 SDK을 저장해 놓은 경로를 지정해 줘야 합니다.

사용자 삽입 이미지

 Windows - Preferences - Android에 위에서 압축을 푼 안드로이드 SDK의 위치를 입력합니다.

여기까지 잘 됬다면 이제 설치끝~! ^^


Chap2. HelloAndroid 프로그램 만들기

이제 모든 프로그래밍의 기본 Hello Andriod를 출력하는 프로그램을 실행해 보겠습니다. File - New - Project에서 안드로이드 프로젝트를 선택하고 Next을 클릭합니다. 그리고 다음과 같이 입력합니다.

사용자 삽입 이미지

Finish를 클릭하면 Hello Android 프로젝트가 생성됩니다. 프로젝트 생성시 Hello Android 예제 패키지를 포함했기 때문에 특별히 코드 수정 없이 바로 실행하면 됩니다. 프로젝트를 실행할때는 꼭 왼쪽의 프로젝트 이름위에서 마우스 우클릭한다음 Run As - Android Application로 실행해야합니다.

처음 안드로이드 프로젝트를 실행하게 되면 안드로이드 Virtual Devices가 없다고 새로 만들라고 창이 뜹니다. 예전에는 없었는데 새롭게 생긴 기능이군요. 이클립스 상단의 휴대폰 모양의 아이콘을 클릭합니다.


새로운 디바이스를 생성하기 위해 위와 같은 창이 열리면 빈칸을 채워넣습니다. 가상의 휴대폰을 하나 만듣다고 생각하면 될것 같습니다. SDCard는 128K or 64M 범위에서 입력할수 있는게 안드로이드 에뮬레이터 사용할수 있는 SD카드의 용량을 설정해 주는 부분입니다.

빈칸을 모두 채웠다면 꼭 Create AVD 버튼을 클릭해 새로운 디바이스를 생성하세요. 새로운 디바이스가 만들어 졌다면 이제 Finish를 클릭한 다음 새롭게 만든 디바이스를 선택하고 실행하면 됩니다.

잠시만 기다리면 안드로이드 에뮬레이터가 실행되고 에뮬레이터에서 안드로이드폰가 부팅됩니다. 부팅 시간이 좀 걸립니다. 부팅을 끝나면 Hello World, Hello! 라는 문구가 화면에 보이게 됩니다.


Hello Android가 실행되는 것을 잘 봤다면 이제 에뮬레이터 버튼을 이것저것 눌러보면서 에뮬레이터 구경한번 해보세요. 재미있는것들 많이 있습니다. 인터넷도 됩니다. 구글맵도 구셩해보고 웹싸이트도 가보세요. 한가지 팁을 드리면 Crtl + F11을 누르면 휴대폰이 옆으로 누은 모습이 됩니다.


이 내용은 헬로 안드로이드라는 책을 참고해서 작성했습니다. 학교 졸업 프로젝트 안드로이드 어플리케이션을 선택해서 이것저것 공부중에 있습니다. 앞으로 유용한 정보있으면 계속 정리해서 올릴께요~

[Source URL: http://bzt-inside.tistory.com/ ]
반응형
posted by choiwonwoo
: