'Story List'에 해당되는 글 172건
- 2013.07.05 :: Google CDN vs Netflix CDN
- 2013.07.01 :: JSON 라이브러리 비교
- 2013.06.29 :: [Unity3D] NGUI: Next-Gen UI
- 2013.06.29 :: [Unity3D] EZGUI vs NGUI
- 2012.01.17 :: [(TIP) C++] Adding Console I/O to a Win32 GUI App
- 2011.12.03 :: [Paxos] Ring-Paxos: A High-throughput atomic broadcast protocol
- 2011.11.30 :: [PAXOS] Paxos made code
- 2011.11.30 :: DOS 명령어
- 2011.11.30 :: Utility to generate Visual Studio solution file for a group of projects
- 2011.11.29 :: [Window] 최대 오픈 세션 수 확인
요즘 각 개발 회사마다 Global Service를 고민하면서 서비스를 기획 및 개발하고 있다. 이 때마다, 항상 고민이 되는 부분은 분산(서비스/데이타) 과 QoS 부분이다. 분산을 높이면, QoS가 낮아지는 현상이 발생하게 된다.(반대 경우도 마찬가지..) 그래서, 아이디어를 찾다가, Google과 Netflix는 어떻게 되어 있나 궁금해서 아래의 자료를 발견했는데, 매우 유용하다고 생각되어 기재합니다.
[OTT Cache(Google, Netflix)와 통신사업자 Transparent Cache - I]
Sandvine사의 Report에 따르면 2012년 하반기 북미 전체 인터넷 트래픽의 33%가 Netflix이고 15%가 YouTube로 이 두 회사의 트래픽만 합쳐도 전체의 48%로 거의 절반에 이른다. 통신사업자의 IP 네트워크는 인터넷이 아니라 두 회사의 비디오 전달망이 된 것이다.
이 두 회사의 이용자수는 계속 증가하고 있고 또한 갈수록 비디오 품질이 고화질화되어 트래픽량 (즉, 전달 비용)이 지속적으로 증가하고 있다. 통신사업자와 OTT는 각각 서로 다른 비용 최소화 전략을 취하고 있는 데 본 블로그에서는 먼저 OTT의 전략들을 살펴보기로 하자.
Google의 CDN 전략
Google은 미국과 유럽, 아시아에 13개(Google이 공식적으로 확인해준 데이터센터만 13개)의 자체 데이터 센터와 자체 CDN을 통해 YouTube 트래픽을 전세계에 전달한다. 이 소수의 데이터센터만으로는 급증하는 YouTube 트래픽을 감당하기 어렵고 또한 Google 데이터센터가 구축되어 있지 않는 나라에서는 YouTube 비디오 시청시 잦은 버퍼링이 발생하는 문제가 발생한다.
이를 해결하기 위해 Google은 2008년경부터 Google Global Cache (GGC)라는 자체 에지 서버를 통신사업자에게 무상으로 제공해주고 있다. Google은 GGC 서버 (H/W and S/W)를 통신사업자의 IDC에 설치해주고 서버 운영도 Google이 한다(원격 관리). 통신사업자는 IDC내 랙공간과 전력, GE 포트를 역시 돈을 받지 않고 Google에 제공해준다.
통신사업자는 외부망에서 유입되어오는 YouTube 트래픽이 대폭 줄어드므로 Transit 비용을 절감할 수 있고 자사 인터넷 가입자들의 "왜 다른 ISP는 YouTube가 빠른 데 우리만 느리냐?"라는 불만을 잠재울 수 있어 좋다.Google은 YouTube 이용자의 QoE를 향상시키고 보다 고화질의 비디오 서비스를 IDC 요금 걱정없이 제공할 수 있어 좋다. 서로 이득이 있으므로 서로 돈을 내지 않는다. 북미와 유럽의 대부분의 통신사업자들이 GGC를 도입하였고 우리나라도 작년 2월에 SK, LG U+, KINX에 도입되었다.
YouTube라는 기가막힌 컨텐츠를 가진 Google은 이렇게 자기 돈 안들이고 전세계 통신사업자의 망내까지 자기 CDN을 확장시키고 있다.


Netflix의 CDN 전략
유료 가입자수가 3천만이 넘고 북미 인터넷 트래픽의 33%를 발생시키고 있는 Netflix도 Google과 동일한 전략을 취하고 있다. 하나씩 살펴보자. Netflix는 자사의 비디오를 이용자에게 전달해주기 위해 Akamai와 Limelight, Level3로부터 CDN 서비스를 받고 있고 이들에게 CDN 이용료를 지불하고 있다.
Netflix는 CDN 사업자에게 지출하는 CDN 요금이 아깝고 또 지금보다 고화질인 Full HD급의 비디오 서비스를 제공하여 보다 많은 가입자를 유치하고 싶은 데 이럴려면 CDN 사업자들에게 지금보다 더 많은 CDN 이용료를 내야 한다.
그런데 옆집을 보니 Google이 GGC를 통신사업자에게 돈 안 내고 밀어 넣고 있고 있네 ! 어 그러면 우리도 컨텐츠의 킹이니, Google처럼 하자- 하여 2012년 6월에 나온 게 Netflix Cache이다.
Netflix Cache도 GGC와 마찬가지로 OTT인 Netflix가 자체 개발한 서버로 통신사업자에게 무상으로 제공해주고 운영도 Netflix가 한다. 통신사업자는 IDC내 랙공간과 전력, GE 포트를 역시 돈을 받지 않고 Netflix에 제공해준다.
현재 미국의 Cablevision, Google Fiber, Clearwire, 캐나다의 Telus, 영국의 BT, Virgin Media, 덴마크의 TDC 그리고 중남미의 Telmex와 GVT에 Netflix Cache가 도입되어 있다(Netflix 서비스 국가). 특히 유럽의 경우는 모든 Netflix 트래픽의 글로벌 CDN이 아닌 Netflix Cache를 통해 이용자에게 전달된다.
Netlfix는 올해 1월 Full HD 화질 서비스(1920x1080, 5~7Mbps)와 3D 비디오 서비스(12Mbps)를 개시했다. Netflix 가입자는 추가 요금없이 고화질 서비스를 이용할 수 있다. 재미있는 것은 이 고화질 서비스가 Netflix Cache가 도입된 통신사업자의 가입자에게만 제공된다는 점이다.
통신사업자의 Netflix Cache 도입을 촉진시키려는 (그럼으로써 CDN 요금을 절감시키고 통신사업자에게 IDC 요금도 안내면서 고화질 서비스를 제공하려는) 의도이다.
이 서비스가 출시되자 Time Warner Cable은 Netflix Cache가 도입되지 않은 통신사업자의 가입자에게도 동일하게 Full HD와 3D 서비스를 제공해야 한다며 불만을 터트리고 있다.
그 동안은 통신사업자의 망중립성에 대한 논쟁이 활발했는 데 꺼꾸로 OTT가 통신사업자별로 컨텐츠를 차별적으로 제공하면 안되지 않느냐는 컨텐츠 중립성 이슈가 나온 것이다.
칼자루가 통신사업자에서 OTT로 넘어간...
하여튼 Netflix도 Google과 마찬가지로 자기 돈 안들이고 세계 각국의 통신사업자의 망내까지 자기 CDN을 확장시키고 있다.
대표적인 OTT인 YouTube와 Netflix가 자신들의 막강한 컨텐츠, 이용자 수를 무기로 자기 Cache를 각국의 통신사업자망내에 진입시키고 있다. 한편 걱정스러운 것은 OTT의 트래픽을 통신사업자망내에 캐싱하여 네트워크 비용을 줄이고 신규 수익원을 만들려고 생겨난 통신사업자 CDN과 Transparent Cache의 시장이 축소될 수 있다는 점이다.
통신사업자 CDN과 Transparent Cache는 국내외 벤더들이 개발하여 통신사업자에게 공급함으로써 벤더들에게 매출 발생의 희망이 있고 또 통신사업자도 망내 CDN을 구축하여 OTT로부터 CDN 이용료를 받을 수 있지만 YouTube와 Netflix가 자사의 Cache를 통신사업자망에 밀어넣으면 OTT를 빼고는 아무도 돈 버는자는 없다.


[소스: http://www.netmanias.com/bbs/view.php?id=blog&no=367]
프러덕트에 적절한 라이브러리 찾다가, 참신한(?) 자료가 내용을 퍼왔습니다.
C++에서 Json을 사용할 일이 생기면서 C++에서 사용 가능한 Json Parser를 조사해 봤습니다.
조사결과 다음과 같은 파서가 존재했으며 간단히 특징을 기술해 보고 테스트 결과를 공유하고자 합니다.
조사 대상
| 라이브러리명 | 언어 | 기타 |
|---|---|---|
| jsoncpp (강추) | C++ | 큰 무리 없이 사용 가능 |
| jansson | C |
오래되고 안정적임. 단 C 언어라 코딩하기 귀찮음. 단, C언어로 개발해야 한다면 jansson을 쓰는 것이 제일 좋음. |
| json spirit | C++ | Boost Spirit library 사용. header only로 설치가 된다던데, 설치 포기. |
| MongoDB의 json parser | C++ |
mongodb C++ driver에 내장됨. Mongo::fromjson() mongodb C++ driver에 있으므로 따로 설치할 필요가 없으나, 사용하기는 좀 어려웠음. |
| UniversalContainer | C++ | 원래 목적은 PHP 등 스크립트 언어의 자료 구조를 지원하는 용도이나, json으로 encode, decode 가능. 설치 후 하는데 고생을 좀 했는데, 테스트 시 seg. fault가 나서 테스트 포기 |
각 라이브러리별 특징을 조사하면 다음과 같습니다.
jsoncpp
- http://jsoncpp.sourceforge.net/
- 큰 단점없이 사용 가능.
- 단, library 빌드 시 -O2 가 안 켜져 있어서 직접 켜줘야 속도가 빠름. 안 그러면 PHP보다 느림.
- library 소스에서 SConstruct 파일을 열어서 CCFLAGS = "-Wall"에 -O2를 추가하거나 scons로 --opt=-O2 주기.
- key 순서가 알파벳 순서로 바뀌어 출력됨.
{"k2":"xxx","k1":"yyy"}의 문서 경우, json 문서를 탐색할 때 항상 k1이 먼저 접근됨.
- key 순서 문제의 경우, http://sourceforge.net/tracker/?func=detail&atid=758829&aid=3014601&group_id=144446 를 참고하여 소스를 직접 바꾸면 된다고 하는데 아직 실험적인 방식이라 시도해 보진 못함.
- UTF-8 문서를 읽는데 문제는 없으나, 출력 시 utf8 문자를 \uxxxx 형태로 출력하는 것은 안 됨. (읽을 때는 가능)
- 앞으로 지원할 예정이라고 함.
- http://jsoncpp.sourceforge.net/roadmap.html 여기에 TODO가 정리됨.
jansson
- http://www.digip.org/jansson/
- 만든지 오래되고 사용하는 곳도 많은 듯.
- 단, C 언어라서 코딩하기가 귀찮음.
- C언어로 개발할 때는 jansson을 사용하는게 제일 좋을 듯.
- utf8 fully support
- json object간에 reference count를 수동으로 기록할 수 있고, 메모리 관리를 개발자가 직접할 수 있음.
- 그러나 이를 관리하기 위한 코딩이 좀 수고스러울 듯.
json spirit
- http://www.codeproject.com/KB/recipes/JSON_Spirit.aspx
- Boost Spirit library를 이용하여 만든 JSON Parser
- header only로 설치 가능하다고 함.
- utf8 지원
- 본인은 library 설치가 잘 안 되고 특별한 장점을 찾기 못해서 더 이상 조사 안 함.
MongoDB의 JSON Parser
- http://api.mongodb.org/cplusplus/2.0.2/namespacemongo.html#a4f542be0d0f9bad2d8cb32c3436026c2
- mongodb C++ driver를 다운 받으면, Mongo::fromjson() method.
- mongodb로 프로젝트를 하는 경우, BSONObj를 다룰 줄 알아야 하므로 json parser로 적당할 수도.
- 단, 64MB 이상의 경우 parsing 하다가 에러 발생.
- mongo/bson/util/builder.h 파일을 열어서 BSONObjMaxUserSize, BufferMaxSize의 값을 늘리면 해결 가능함.
- json 파싱 시간은 느리지만, 메모리 사용량은 다른 것보다 적음. (Bson 형태이므로 압축 효과가 있어서 그럴 듯??)
- JSON 문서가 항상 object로 시작하고 key가 있어야 함. 이건 좀 불편함.
[{...}] <= object로 시작하지 않아서 안 됨.{"temp":[{...}]} 로 변환해야 함. - key에 _id가 항상 삽입됨....
UniversalContainer
- http://greatpanic.com/progdocs/libuc.html
- 원래 목적은 자료 구조를 PHP, Perl 처럼 쉽게 접근하기 위한 목적임.
- 자료 구조를 JSON으로 serialize, de-serialize 가능함.
- FlexLexer.h 파일 문제 때문에 컴파일이 안 되는데 인터넷 찾으면 설치는 가능함.
- 어렵사리 설치를 했으나, 테스트 해 보면 seg. fault가 많이 발생.
- 더 이상 테스트 포기
- 복잡한 자료구조를 담고 사용하는데 편리해 보였는데 테스트 조차 못해서 아쉬움이 큼.
- 그런데 jsoncpp로 복잡한 자료 구조를 담고 사용하는데 편해서 다행임.
성능 테스트
평가 결과는 각자 환경마다 다를 수 있으니 너무 맹신하진 마세요.
평가 대상
총 5개의 Library 중, 테스트 가능한 다음의 2개 + PHP가 테스트 대상임.
- jsoncpp
- janson
- Mongo::fromjson
- PHP
평가 환경
- 입력 파일
- 파일 사이즈 : 250MB
- 2차원 array 형.
[{....} <= depth 확장 없음. 총190만개의 element가 있음.......{....}]
- 평가 항목
- parsing 시간
- parsing 시 메모리 사용량
- 탐색 시간 (각 element의 특정 key를 출력)
성능 평가 결과
| 구분 | jsoncpp | jansson | PHP | Mongo::fromjson |
| parsing 시간 | 10초 | 13초 | 10초 | 24초 |
| 메모리 사용량 | 1.4GB | 1.3GB | 2.5GB | 800MB |
| 탐색 시간 | 13.7초 | 13.8초 | 13.4초 | N/A |
결과에 대한 소고
- PHP가 생각보다 빠름.
- parsing 자체는 C 모듈이 담당하기 때문이겠지...
- 그래도 jsoncpp나 jansson이 더 빠르길 기대했는데 좀 아쉬움..
- jansson이 약간 느린데 jansson library가 -O2 켜진 상황에서 설치된 것인지 확인 못함.
- 만약 O2가 아닌 상태로 설치되어서 O2를 킨다고 하면 좀 더 빨라질 수 있으므로 참고.
- JSON 포맷에 따라 결과가 달라질 수 있으므로 유의.
아래의 사이트에 가면, Free version의 NGUI를 구할수 있고, 사용 동영상을 볼수 있다.
http://forum.unity3d.com/threads/114833-NGUI-(Next-Gen-UI)-demo-amp-final-feedback-request
Choosing GUI framework for your Unity3D Project: EZGUI vs NGUI, Part I
The following post might be helpful for those standing on the crossroad which GUI framework to go with in Unity project. Among lots of more or less advanced 3rd party options there are just two which can be seriously considered: EZGUI and NGUI. I’ll clarify major differences I’ve noticed in my experience working with both of them.
EZGUI and NGUI provide great features for making in-game UI easily and efficiently. However they use different implementation approaches. EZGUI comprises lots of instruments and controls with plenty amount of settings, so you can tweak almost every parameter of any UI element. In opposite, NGUI provides lots of small components and I like its minimalism, short, clean and understandable code. Both EZGUI and NGUI target “1 draw call for UI” and they’ve got very close. Of course “one-draw call for UI” isn’t the main concern, but why not to have such a great addition to your well-structured and optimized code.
The following table contains a comparison of both frameworks with features I find important:
|
| |
Pixel perfect | Scale of controls is adjusted automatically once on a scene start. Note: it has issues losing render camera reference when instancing UI as a prefab | Scale of controls is adjusted automatically every time resolution changes. Also has ability to apply half-pixel-offset |
WYSIWYG | Generates ordinary gameobject with geometry, so everything is visualized by Unity itself | Uses several ways of visualization: “geometry” and “gizmos”, since all UI elements are a part of a single mesh |
Access from code | Methods from a specific controller-script are linked with control events. There can be some issues with instancing objects and losing references. Another way –using delegates can be more convenient in some cases | Similar as EZGUI, but here you have helper components, such as UIButtonMessage, which send specified message to a gameobject (or to itself, if target is null), on selected type of interaction. Also you can access to last used control through static variables such as UICamera.lastHit or UICheckbox.current |
Ease of controls creation | Empty GameObject is created and attached with necessary components | Provides handy wizards for creating all kind of controls. |
Workflow speed | Smooth, but slow. Searching scripts which aren’t included in common menus, adjusting tons of settings, fixing broken atlases and lost camera references (most likely I’m not the only one who experienced these issues) | Supersonic! Just a little slowdown when creating atlases for sprites in the beginning, and then pure enjoyment of future process! |
Drag and Drop | Both frameworks have this feature. Just a little note: any object in NGUI with a collider can be draggable | |
Atlases creation | Atlas has to be recreated every time you want to add/change an image in it. EZGUI can scan all objects, even in a project folder, find all using the same material and then regenerate the atlas. This process takes lots of time and you should be very accurate not to break something | Atlas can be managed in two ways: either using fast and handy Atlas Maker to add, delete or modify images in atlas or managing sprites in atlas already created via Atlas prefab inspector |
Panels switching | Making menus with switching panels has never been easier due EZGUI’s powerful abilities | Panels can be switched easily as well, but some additional scripting is required. Panels can be switched through animations and helper components, but I haven’t found any direct way to enable one and disable another panel |
Additional stuff | Since EZGUI is based on Sprite Manager, classes (e.g. Sprite etc.) can be quite useful in 2D games for environment creation, backgrounds etc. | Sprites can be used, however with some restrictions like any control must have a parent like panel or UIRoot. |
And here is a comparison by controls implemented in the frameworks.
Control | ||
Label | ||
Sprite | ||
Sliced sprite | ||
Tiled sprite | ||
Filled sprite | ||
Simple button | ||
Image button | ||
Toggle button | ||
Radio button | ||
Checkbox | ||
Progress bar | ||
Slider | ||
Input | ||
DropDown list | ||
Scrollable lists |
I was really excited with Sliced Sprite from NGUI. When there is an objective to create a resizable window that should be pixel-perfect in different sizes, have a frame outside of it and be filled with a pattern - that’s exactly when Sliced Sprite can manage everything, just specify areas on texture to be used as a frame, corners and filling.
Tiled Sprite can be implemented manually with EZGUI, however it won’t be so easy. Tiled sprite always stays pixel-perfect, and it tiles the texture you’re using when scaling. That’s very handy for creating backgrounds for example.
NGUI extends Unity with a bunch of useful hotkeys which are really nice-to-have, e.g. Ctrl+Shift+N to add new empty GameObject as a child to selected one, hotkey for toggling gameobject’s activity, handy buttons for resetting transform’s position, rotation and scale.
Both frameworks are provided with detailed documentation describing every script, every component, property or method. Additionally, NGUI is shipped with a lot of step-by-step tutorials, video and write-up lessons for beginners.
EZGUI is based on Sprite Manager 2 (developed by Above and Beyond Software). SM2 provides features for creating 3D mesh sprites, customizing and changing their parameters in runtime, as well as creating texture atlases, so that all sprites in a scene are a part of single batch and are drawn in one draw call.
And here’s my subjective comparison of these both frameworks:
|
| |
Usability |
|
|
Functionality |
|
|
Flexibility |
|
|
Reliability |
|
|
Extensibility |
|
|
…that means I like NGUI much more, however I haven’t described another very important difference between NGUI and EZGUI - the way of working with them. I’ll demonstrate it in my next post, stay tuned.
Choosing GUI framework for your Unity3D Project: EZGUI vs NGUI, Part II
As a follow-up to «Choosing GUI framework for your Unity3D project: EZGUI vs NGUI, Part I» here is another post comparing these both frameworks by workflows. They are quite different, probably when you realize it with this small example how to create a simple button, you will make your decision more confidently which framework to choose in your project.
Creating simple button with EZGUI
First of all let's create an orthographic camera in UI layer that will render UI-stuff only: GameObject -> CreateOther -> Camera and set it up as shown below:

You see I’ve attached UIManager component.
Create an empty GameObject called “Button” and attach Button component to it (“Component/EZ GUI/Controls/Button”). The script needs to be set up as well. Assign UI Camera in Render Camera slot, and check Pixel Perfect checkbox (Auto Resize will be checked automatically). And here is one of the most annoying disadvantages of EZGUI – when instantiating UI element as a prefab, there’s no guarantee Render Camera will be assigned correctly.
We will also need several button images for all button states: Normal, Over, Active, Disabled

Next, you will need to create atlas for button states. Just press this little gear and select “Build Atlas“

And here is the texture:

Note that atlas can contain not only states for single button – but for all the elements in your entire UI. But I would highly recommend sorting them by screens, like start screen elements in one atlas, settings screen in another. I like this way, because you won’t load memory with redundant atlases.
Now let’s make it working. It’s quite simple with EZGUI: just specify GameObject that has a script with a method that will be called when button is pressed.
Here’s the script that we have to attach to a “controller” GameObject.


Then configure the button: set controller GameObject in “Script With Method To Invoke” slot, specify method name in “Method To Invoke” field and select “When To Invoke” option.

Now if you click “Play” you will get fully functional button. Here we go…

And here is just a little tip. Attach EZ Screen Placement component to your button and it will be placed on screen just the way you need. For example you can stick your button with the top right corner of screen, or stick with some object, and it will maintain constant pixel offset in screen coordinates. Again be very careful with Render Camera. This is the first point you need to check if you see that your elements are moved to incorrect position or have a wrong scale. Also this component stops working in editor mode when you have it on prefab instance and click “apply” button – just click “Play” and then “Stop” to fix this.
Creating simple button with NGUI
Basically, both EZGUI and NGUI work with similar principle – generating meshes, generating UV coordinates and applying textures automatically. However NGUI’s “Button” doesn’t actually mean what we used to think. “Button” is everything in the scene that has a collider attached and is visible by camera having UICamera component, so this pseudo-button object can receive events, generated by UICamera. Here’s the list of all events.
When you see UIButton* (e.g. UIButtonColor) component, it does not mean that it has to be attached to something like a button (well, you won’t even find UIButton component in the list of scripts). Instead, it can be attached to ANYTHING that has a collider, for example – UICheckbox, and your own script, attached to this checkbox, will receive all the events from the list. Well, UICheckbox is just an example, but even a sphere with a collider can receive events! (It can be seen in one of examples provided by Tasharen Entertainment)
Now let’s do the same job using NGUI and start with some preparations. You need to create atlas for UI. In comparison with EZGUI – NGUI atlas is not just a texture – it’s a prefab that contains all information about sprites. It can be easily created using Atlas Maker.

By clicking “Create” button, wizard creates new material and prefab that will store all required information about atlas and sprites.

Great advantage of NGUI atlas is a possibility of adding and deleting images from atlas without rebuilding it totally. As you can see below, all you need to do is just select textures you want to add/update. In this case you see four new textures will be added to the atlas TestAtlas.

After adding images to atlas, you will be able to add, delete, and modify them at any time which is cool I think. The only thing I miss here is forcing creation of square atlases, which is required for PVRTC compression on mobile devices.

Atlas prefab can be edited from its inspector, where you can add, delete and setup sprites, with real-time preview of what you are doing.

So, when you’re finished with sprites, you can go ahead to creating your UI.
Create a base for the future UI. NGUI -> Create new UI. UI Tool opens up.
Just set a layer where UI will be rendered and a camera you’re going to use.

You will see the following hierarchy:

- “UI Root” is responsible for scaling the entire UI, to maintain its screen size when changing resolution.
- “Camera” renders UI geometry (btw, this geometry is handled by UIDrawcall script). It also sends events to objects.
- “Anchor” is used for placing widgets in correct positions, add half-pixel offset to all UI (you can read about half-pixel and half-texel offsets here), and it also can be used to stretch sprites to fill entire screen on different resolutions, e.g. to be used as tiling background.
- “Panel” groups UI objects (widgets) together and shows some debug information about widgets it contains. Also it has clipping ability to be used in scrollable lists.
Next step – creating widgets. “NGUI -> Create a Widget” opens Widget Tool. In order to create a widget of any type you need to specify an atlas where required sprites will be taken from, widget template – in our case it would be “Image Button”, that works quite similar to EZGUI’s button, setup images needed for three button states – normal, hover and pressed (I’m not sure why, but there’s no disabled state), and press “Add To” button.

That’s it, you already have you button! Just hit play and check it out!

And the last step – the button interaction with scripts. Attach “UI Button Message” component to the button. It allows calling methods in the script attached either to a button GameObject or any custom GameObject, specified in “Target” slot. If target GameObject isn't set, the button GameObject itself will be assigned as Target automatically.

You can see UIButtonMessage component on the screenshot, with Function Name specified – the name of method that will be called on a specific event (check “Trigger” variable).

Then, we press our button and here’s it:

Finally EZGUI or NGUI?
Personally I stick with NGUI that attracts with its minimalism, short, clean and easy-understandable code, stability and optimization. I really hope these posts were helpful for you. Please put comments, ratings and suggest what to add\improve, I’ll be able update this post later.
[source: http://blog.heyworks.com/choosing-gui-framework-for-your-unity3d-project-ezgui-vs-ngui-part-i/]
1) 콘솔창 사용
http://www.halcyon.com/~ast/dload/guicon.htm
http://www.codeproject.com/KB/debug/mfcconsole.aspx
2) log4xx를 사용
기본기능으로 console기능 지원도 하지만, 로그에 대한 뷰여가 좋은 것들이 많아 콘솔과 같은 느낌을 준다.
cf) Unix/Linx에서 지원하던 tail이 윈도우로 mtail이라고 있지만, 내부 버퍼, 그리고 UI가 아직은 비호감이다.
http://wn.com/Paxos_algorithm
현재 4번째....반복중..
분산을 공부하다보면 나오는 필수적인 개념으로 보인다.
하나씩 돌파 해보자.
아래 논문부터...
 marco.pdf
http://www.inf.usi.ch/faculty/pedone/MScThesis/marco.pdf
1. 도스 명령어를 사용하여 폴더 구조를 보기
> tree /f
> tree /a
> dir /s \wonwoo.txt
[ /s는 현재 디렉토리와 하위 디렉토리 포함]
[ \ <== root 디렉토리]
3. 특정 디렉토리 찾기
> dir /s /a:d \wonwoo*
[wonwoo라는 이름을 가진 모든 디렉토리 찾기]
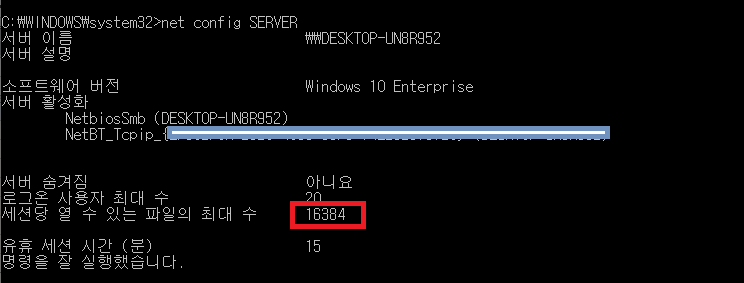
유닉스/리눅스에서는 다양한 방법으로 File descriptor(socket descriptor) 수 확인과 기동중인 프로세스가 점유중인 자원을 확인할 수 있다. 윈도우에도 똑 같은 기능이 있다고 생각되어 방법을 찾아 보았다.
방법:
이 명령어 실행하면, 시스템의 최대 File descriptor 수와 세션당 오픈할수 있는 최대 File descriptor수를 확인할수 있다. (이 명령어는 유닉스의 ulimit -a와 유사하다. )